17

This is an area were users can submit their entries for 'best blog post' part of the Super User 2nd Anniversary Competition. Feel free to post your submission here in its entirety. Other user can vote for the best ones, but ultimately the decision is up to moderators, judges and editors of the blog.

Remember to keep the post generally on-topic for Super User (this means nothing related to phones, portable devices, electronics, and even puppies). However you can conduct reviews of software, or hardware if you so desire. Keep these blog posts in mind as examples of excellent blog posts:

Good Luck!


For your convenience, a lexicographically ordered list of the contest entries:

1
  • 4
    Just because there's already a draft, doesn't mean the rest should despair and not give sblair some competition!
    – Ivo Flipse
    Commented Aug 25, 2011 at 10:02

4 Answers 4

12

@slhck provided valuable suggestions and proof-read most of this. Thanks Werner!

Username

Customizing Your Bash Command Prompt

When you're working on your Linux or Mac OS X system's command line, the prompt is the text to the left of the commands you enter. The default prompt varies for every system, but it usually gives you an indication of your username, your machine's host name and your current working directory. Also, it ends with a dollar sign $ if you're working as a normal user. If you're working with root privileges, it ends with # instead.

The prompt can be customized to include relevant information that can help you increase productivity, to hide information you don't care about, or to highlight the lines in your terminal output where you entered commands.

This post will show how to customize your bash prompt, and, in the process, explain a few of its more advanced features that improve your productivity. Bash is the default shell on Mac OS X, available for all (or most) Linux distributions, if not already included, and available on Windows via Cygwin.

Continue Reading…


Bash primarily uses two variables that define how your prompt looks like:

  • PS1 specifies the format of your regular prompt that appears to the left of every new command you type
  • PS2 defines the continuation prompt: It appears when you enter a line ending with a backslash \ to continue input on the next line.

In the following example, I split the ls command over two input lines to show my system's default PS1 and PS2 in action:

Saurus:~ danielbeck$ l\  
> s  
Desktop     Documents   Downloads   Library     Movies      Music       Pictures    Public      Sites
Saurus:~ danielbeck$ _

In this post's monospaced example sections, an underscore will represent the cursor position when showing examples of a prompt, while a single $ character represents a generic prompt, except where otherwise noted.

As you can see, my PS1 prompt contains

  • the host name (Saurus),
  • the current working directory (~ is a synonym to the user's home directory),
  • my username (danielbeck),
  • and an indicator that I am a regular user ($).

The second line is my default continuation prompt: A greater-than sign, followed by a single space.

You can assign different values to your prompt right in your shell session, as shown below. The values you set this way will be reset once you close your session, so you can experiment freely with the examples in this post. Just restart your shell session to reset the prompt variables to your permanent default values.

Saurus:~ danielbeck$ PS1='my new prompt $ '
my new prompt $ _

To display the currently assigned values (e.g. for copying them to your bash configuration files), you can echo these variables. The second line in the following example is the output of the command on the first line, the prompt is repeated after execution on the third line:

my new prompt $ echo $PS1
my new prompt $
my new prompt $ _

Once you start adding shell scripts and program invocations to your prompt (see Executing scripts and programs below), this will already contain evaluated expressions, so you should not rely on this alone.

Displaying additional information

Bash supports several placeholder sequences for certain kinds of information that are commonly displayed in a prompt. These take the format of a backslash \, followed usually by a single character. Of course, you can find a list of all possible placeholders in the bash manual. To re-create the default prompt shown above, one would enter the following:

 $ PS1='\h:\W \u\$'

This prompt contains the host name, followed by a colon, followed by the current working directory, a space character, the user name, and the prompt indicator. As already mentioned above, it is a hash character # if the user has root privileges, and a dollar character $ otherwise.

In this question, Xenorose asked:

I'm currently on a Linux machine and the shell prompt is showing me the […] number of executed commands. My own computer doesn't have this, how can I configure it?

The answer is the placeholder sequence \#: It prints the command number of the command following it. The first command of a bash session starts at 1, and every subsequent command increases it by 1. In the following example, PS1='\# \$ ':

Last login: Thu Aug 25 21:54:14 on ttys001
1 $ pwd
/Users/danielbeck
2 $ pwd
/Users/danielbeck
3 $ pwd
/Users/danielbeck
4 $ _

A very similar sequence is \! which represents the history number of the command following it. You can execute the command on that line again by entering an exclamation mark, followed by that command's history number.

$ PS1='\! $ '
1478 $ pwd
/Users/danielbeck
1479 $ cd /
1480 $ !1478
pwd
/
1481 $ _

As you can see, the command executed through history expansion of !1478 is printed again (pwd), and then executed, this time with different results.

Once your prompt grows in length, you might want to add a line break or two to it by adding \n at the appropriate positions.

Colors

The prompt, or parts of it, can also be a different color than the default. Doing this is a bit tricky though. There are another few special sequences used for this. Similar to HTML or other document markup languages, the highlighted parts are enclosed in a pair of special formatting sequences. For HTML, this would be the <span> and </span> tag pair. In bash, it looks like this:

regular text \[\033[0;32m\] green text \[\033[m\] regular text again

This example produces the following output:

enter image description here

The actual formatting code is enclosed, similar to angle brackets for HTML tags. \[ and \] are special sequences that indicate non-printing sequences, so bash can ignore everything between them for length calculations (e.g. when wrapping output lines depending on the terminal width). Strictly speaking, they're optional, but you don't want to mess up your terminal's line breaking behavior by skipping them.

\033 is another special sequence: The digits are octal and represent the ASCII character with the corresponding code, in this case Escape. It starts a terminal control escape sequence (\033[…m) specifying font and color attributes. For a list of such escape sequences, see this web page.

We use two of these sequences:

  • \033[0;32m resets text formatting and makes the following output a regular green
  • \033[m is an "empty" sequence containing no formatting rules. It resets output formatting to its defaults.

This page provides a nice PS1 (at the bottom) so you can see all colors and other formatting options as part of a single PS1. Just be prepared to endure blinking text, if your terminal emulator can handle it.

Through some bash debugging facilities, it's even possible to add these formatting rules to the commands you enter.

Executing scripts and programs

You can execute arbitrary CLI programs as part of displaying your prompt, adding their output to it. For example, you might not like the behavior of \W to print ~ instead of the full path to your home directory. No problem, just run pwd, enclosed in $( ), instead:

Saurus:~ danielbeck$ PS1='\h:$( pwd ) \u\$ '
Saurus:/Users/danielbeck danielbeck$ _

We usually have a choice of enclosing strings in single or double quotation marks. Since bash evaluates all expressions enclosed in $(…), like $( pwd ) here, as well as variables (e.g. $PS1), when enclosed in double quotation marks, we need to make sure to put values assigned to PS1 in single quotation marks now. It didn't make a difference earlier, but we want these commands to be evaluated every time PS1 is printed by the shell, not just once when the value is assigned to PS1. Just remember to always use single quotation marks and you won't run into this problem.


In my experience, it's sometimes easy to overlook non-zero return codes of more complex commands with many lines of output. To make sure I notice these possible errors, I can add the previous command's return code to my prompt, like with the following PS1:

PS1='$( RET=$?; if [ $RET != 0 ] ; then echo "rc: $RET"; fi )\n\$ '

As a side effect, your prompt will now always start with a blank line if the previous command returned 0. While you can add line breaks to your prompt by using the sequence \n, bash discards all other newlines that are a result of e.g. multi-line program return values.

If you want to have a multi-line output depending on some conditions, you need to put that part of your prompt into the variable PROMPT_COMMAND. It is expected to contain a script that is executed just before PS1 is printed. To continue with the previous example of program return codes, use the following:

PROMPT_COMMAND='RET=$?; if [ $RET != 0 ] ; then echo "rc: $RET"; fi'
PS1='\$ '

This produces almost the same results as the previous example, except that executing programs with exit code 0 won't print an additional blank line now.

To reset PROMPT_COMMAND again, you can assign it an empty value:

PROMPT_COMMAND=

Complete example

The following prompt is an example on how you could combine the various elements I mentioned above into a powerful and informative prompt. I've been using this prompt, or slight variations of it, for a few months now.

I'll start with PROMPT_COMMAND, as its output appears first:

PROMPT_COMMAND='RET=$?; echo; if [ $RET != 0 ] ; then echo "rc: $RET"; fi; if [ "$PWD" != "$HOME" ]; then if [ $( ls -A | wc -l ) -lt 20 ]; then ls -mAF; fi; else ls -mF; fi'

  • This reads the last command's return value, and if non-zero, prints it on a separate line.
  • If the current working directory is not the home directory, and has fewer than 20 files and folders in it, list them. If the current working directory is the home directory, only list non-hidden files and folders.

The prompt itself:

PS1='\[\033[0;32m\]\u\[\033[00m\] in \[\033[0;32m\]$( pwd ) ($( OUT=$( ls -A | wc -l ); echo $OUT ) entries, $(( $( ls -A | wc -l ) - $( ls | wc -l ) )) hidden)\n\[\033[1;32m\]#\# !\! \$\[\033[;m\] '

  • Print the user name,
  • the full current working directory (i.e. no ~ instead of /Users/danielbeck),
  • the numbers of both all and hidden files and folders in the current working directory,
  • and on the next line, print the command and history numbers, and the root privileges indicator $/#.

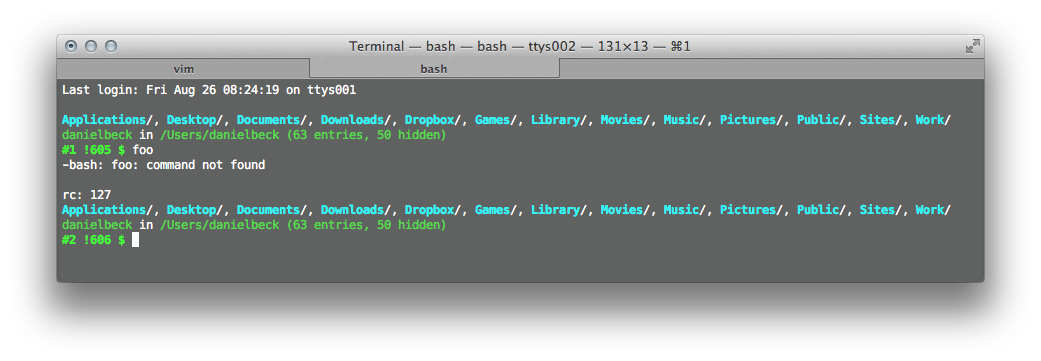
On my Mac, it looks like this:

enter image description here

Through color highlighting, the prompt is easily visible between program invocations with lots of output. It prints the previous command's return code unless it's 0, and lists all files in the current directory if the file count is reasonably low. I prefer this to functions that combine cd and ls, as I can immediately see the changes to the current directory after program execution.

Persisting changes

As I wrote at the beginning, your prompt is not kept across shell sessions when you simply set PS1 (or PS2) in your shell. To keep your changes across sessions and restarts of your machine, add the relevant assignments of PS1, PS2 and PROMPT_COMMAND -- one per line -- to your .bash_profile or .bashrc file in your home directory (more on these files). Save the file, open a new bash session, and enjoy your custom prompt!

6
  • I appreciate comments that help me improve both the content of this post and my writing in general. So if you have suggestions, go ahead and add a comment. Thanks!
    – Daniel Beck Mod
    Commented Aug 28, 2011 at 20:02
  • I don't see anything really wrong; as for formatting, I think that you could do a small improvement by putting enumerations (in the first part, where you explain PS1, CWD, ...) and instructions (very last paragraph) into lists. Commented Sep 2, 2011 at 17:25
  • Thanks @Tom for the suggestions!
    – Daniel Beck Mod
    Commented Sep 3, 2011 at 8:59
  • 1
    I'd really appreciate feedback from the person down voting. (And of course from those that are up voting, but that won't surprise anyone ;-) )
    – Daniel Beck Mod
    Commented Sep 3, 2011 at 10:38
  • @DanielBeck are any of these specific to OS X? Or Just Bash?
    – Sathyajith Bhat Mod
    Commented Sep 3, 2011 at 16:22
  • @Sathya This is all bash (version 3.2) behavior, although I imagine some of this also available in other shells. $( ) is from csh I believe. Since I only use bash on Linux and OS X, I don't know for sure. The only thing OS X in this post is my home directory path (/Users/username), the screen shot of Terminal.app and possibly the default prompt I show at the beginning. That's why I could quote from a Linux-related question regarding history command, and mention Linux (and Cygwin) in the introduction. I also use the prompt I show at the end on multiple Linuxes, slightly modified.
    – Daniel Beck Mod
    Commented Sep 3, 2011 at 16:32
11

Here's a draft I received from sblair, who sadly at the moment could not post it himself.

sblair

Building a NAS Server

After reading a review of the Drobo FS, I became obsessed with network attached storage (NAS). I realised that a NAS device would neatly solve a couple of long-standing problems I hadn't got around to fixing: data backup and data organisation.

This post will explain how I picked the hardware and software for my NAS.

Continue reading...

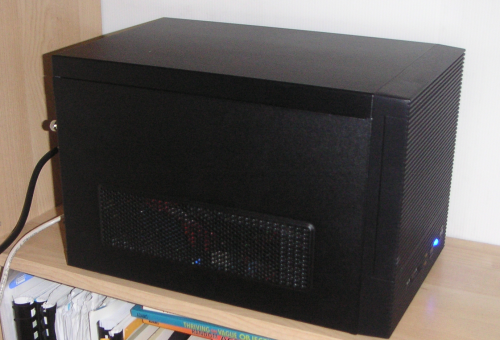
My NAS server


To buy or to build?

The Drobo FS itself, while a compelling product, is expensive. There are also some worrying stories of problems with poor read/write speeds, noise, and the slightly ropey client software. But mainly, I feel it's my duty to build my own computers.

Nevertheless, maybe you run a small business and prefer to think of a NAS as an appliance – something that has a warranty and a customer support email address. This is where the pre-build solutions from Drobo, Synology, ReadyNAS, etc., excel. SmallNetBuilder is a great resource for finding out more about that sort of thing.

Hardware

I guessed that 4 x 2TB hard drives with single-drive redundancy would suit me, leaving a usable space of around 5.5TB. With that settled, I could pick the hardware:

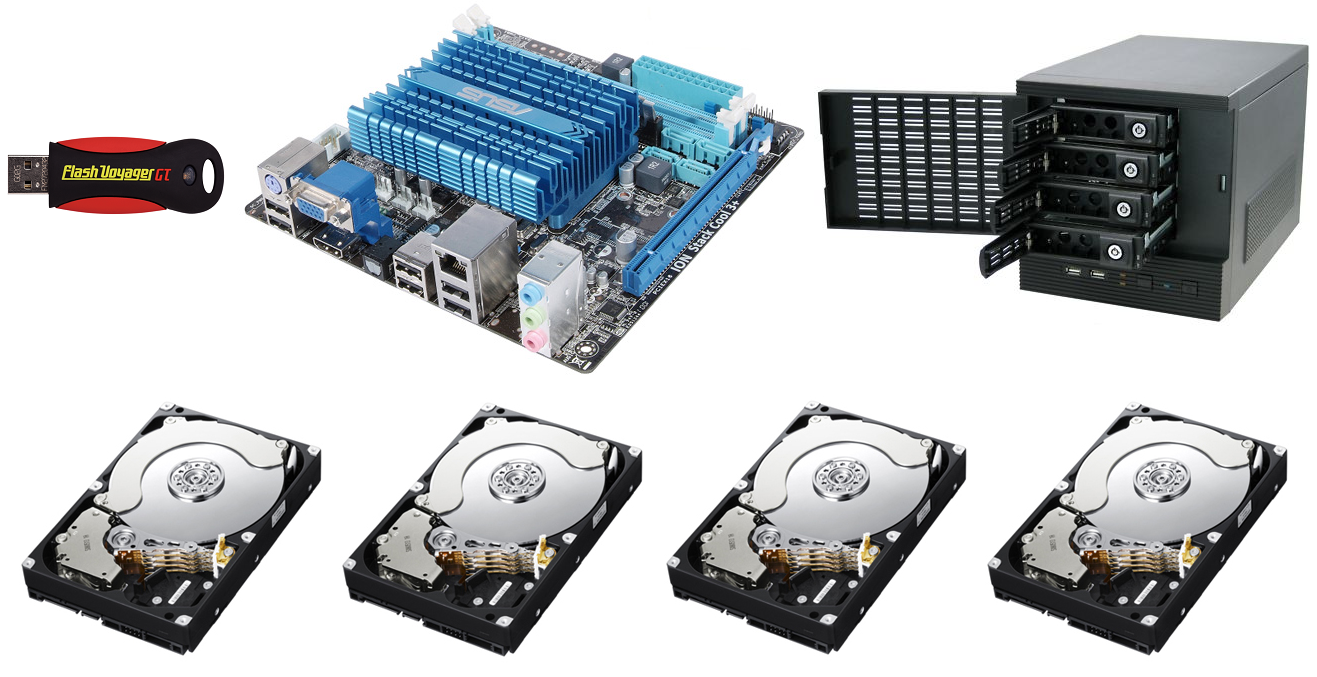
Hardware montage

  • CFI A7879 Mini-ITX NAS Server Case (£98.40 from LinITX)
  • Atom 330 CPU (dual-core) + ASUS AT3IONT-I Mini-ITX motherboard + fanless heatsink (£112.83)
  • 4 x 2TB hard drives (£240 total)
  • 2GB memory (£19.99)
  • 2 extra SATA cables (£3.65 total)
  • 2GB USB boot drive (pretty much free)

...totalling £474.87 (about 775USD). This is almost exactly the cost of a 5-bay Drobo FS, without drives, at £476.54!

Case

The case was a little expensive, but it does the job well. Some basic instructions would have been nice - it took 5-10 minutes of fiddling to figure out how to get drives inside. The other 4-bay NAS case option I found, the Chenbro ES34069, was even more expensive. (For a 6-bay NAS, the Lian Li PC-Q08 got a decent review, but the Fractal Array R2 did not.)

CPU and motherboard

I chose the motherboard because it hit the sweet spot of price, power consumption, SATA ports, and availability. Also, FreeBSD supports the Ethernet chipset, which was important (see below). Newer Atom CPUs, such as the D510, should be more power-efficient overall (because of the on-die memory controller and graphics) but none were readily available.

Temperature, noise, and power

I wanted to minimise noise, so passive CPU cooling appealed to me. The case includes a PSU fan and a 120mm case fan, which are fairly quiet. The motherboard does dynamically adjust the case fan speed based on the CPU temperature. CPU and hard disk temperatures are normally 35-45°C, depending on the ambient temperature. The hard disks can be noisy when seeking.

The normal total power consumption is about 43W. This is while running a BitTorrent client, and so all four hard disks are spinning. I'm fairly happy with this, because the drives are benchmarked at about 4W idle, and 5.6W while seeking. Because the NAS will be running 24 hours a day, it should cost about £43 a year to run (1W roughly equates to £1 over a year).

If I turn BitTorrent off and allow all the drives to power-down to standby mode, power consumption drops to about 29W. For comparison, the Drobo FS is rated at about 12W (idle) and 56W (busy), with four drives.

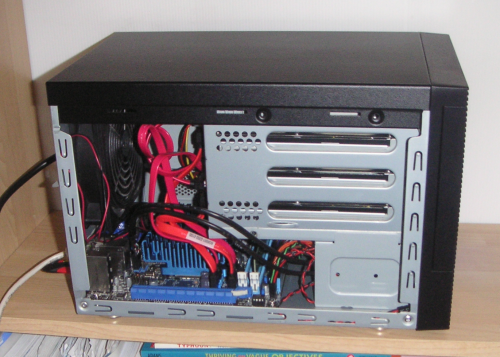
NASPORN

OS/software

Picking hardware was time consuming, but relatively painless. Software was a lot trickier to nail down, given all the options:

  1. FreeNAS, using ZFS
  2. Plain FreeBSD, using ZFS
  3. Solaris, using ZFS
  4. Linux and mdraid (software RAID)
  5. Linux and ZFS, via ZFS-FUSE
  6. unRAID
  7. OpenFiler
  8. Greyhole
  9. NexentaStor
  10. OpenIndiana
  11. Windows Home Server (2007 is often preferred to 2011 because of the Drobo-like Drive Extender)

The only easy part was that I wouldn't settle for anything less than ZFS. (The next section explains why.) This eliminated Linux (I didn't want ZFS-FUSE because of the performance implications) and OpenFiler. I also ruled out unRAID, NexentaStor, and Windows Home Server, because they (can) cost money. Greyhole looks like a great idea (similar to ditto blocks in ZFS), but I didn't want to have to manually split my data into "important" and "unimportant" bins. Also, parity-based redundancy is far more efficient, in terms of hard drive space, than the full mirroring offered by Greyhole - especially as more drives are added.

Why ZFS?

"End the suffering" -- Jeff Bonwick & Bill Moore

ZFS originally stood for Zettabyte File System (due to the immense storage limit of 256 x 1015 zettabytes), but it is much more than just a file system. Importantly, it is also a kind of local volume manager (LVM). That means that ZFS likes to control both the allocation of physical drives to logical storage entities (vdevs and zpools in ZFS), as well as the organisation of files within those zpools. This gives ZFS significant power, compared to a layered approach. For a NAS device, a couple of features are worth looking at in more detail: data integrity and RAID-Z.

Self-healing data

ZFS really cares about keeping your data safe. CERN - which famously handles a lot of data - did an experiment with 3000 hardware RAID cards. They experienced 152 cases of silent data corruption within three weeks. Although slightly mystical-sounding, bit-rot really can happen.

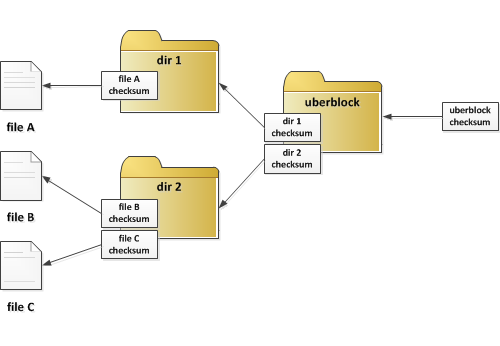
In order to provide the so-called end-to-end data integrity, ZFS simply stores checksums away from data blocks. In fact, the checksums themselves have their own checksums further up the chain, and so on until the root of the file system (known as the uberblock). The entire file system hierarchy is a self-healing hash-tree. Here's a simplified diagram:

Simplified ZFS hash tree example. Note that data is only at the leaves.

Going from left to right, directory 1 contains a pointer to file A, file A's checksum, and some other meta-data. But dir 1 is just another data block, which is pointed to by the uberblock. The uberblock therefore contains a checksum of dir 1, and so on. This does mean that every write to a file involves recalculating several checksums, all the way back to the root node (the uberblock). But ZFS's copy-on-write policy (see below) and transactional nature mitigate the performance penalty. Furthermore, ZFS is designed to take advantage of Moore's law: CPU cycles are cheap, but hard drives are slow.

This all means that ZFS can check your data at any time - and it can often repair data after a variety of problems.

RAID-Z: fixing RAID 5

ZFS's answer to RAID 5 is called RAID-Z1, but it has important advantages over hardware RAID 5. RAID-Z avoids the dreaded write hole, where loss of power during a write operation can (silently!) leave the data drive and parity drive inconsistent. In ZFS, the copy-on-write policy solves this problem because ZFS always writes to a new block, and then atomically updates the block pointers:

A copy of the file system structure is made when in the process of writing new blocks. If a drive failure happens during the write, the original data is still accessible and the file system knows that the write operation didn't complete.

RAID 5 also has a performance problem with partial stripe writes, because the old stripe data must be read before being modified and written back. RAID-Z uses dynamic stripe width; so all writes are full-stripe writes, and this problem can never occur.

FreeNAS

What is it, and why do I need it?

FreeNAS is based on FreeBSD, but with a few clever changes that make it great for NAS servers. Naturally, it inherits FreeBSD's ZFS support, if a little out of date. I decided to use FreeNAS, rather than any other ZFS-capable OS, for two main reasons:

  1. The boot-from-scratch philosophy makes backing-up and restoring the entire OS (well, the XML settings file, not a binary image) very simple. If anything ever goes badly wrong with the OS, I just burn the OS image to a USB drive and upload the settings file. Nothing to install, nothing to configure. It also means that the OS is not stored on a data drive. And booting from USB ensures that the OS does not use up a valuable SATA port. (In fact, FreeNAS boots from USB and copies the OS to a RAM-disk for two reasons: 1) the OS is "clean" at each boot, as described above, and 2) to minimise writes to the flash memory.)
  2. FreeNAS's purpose-built web interface also means that you rarely need to ssh to get stuff done. In fact, once it's up and running, you rarely need to touch anything.

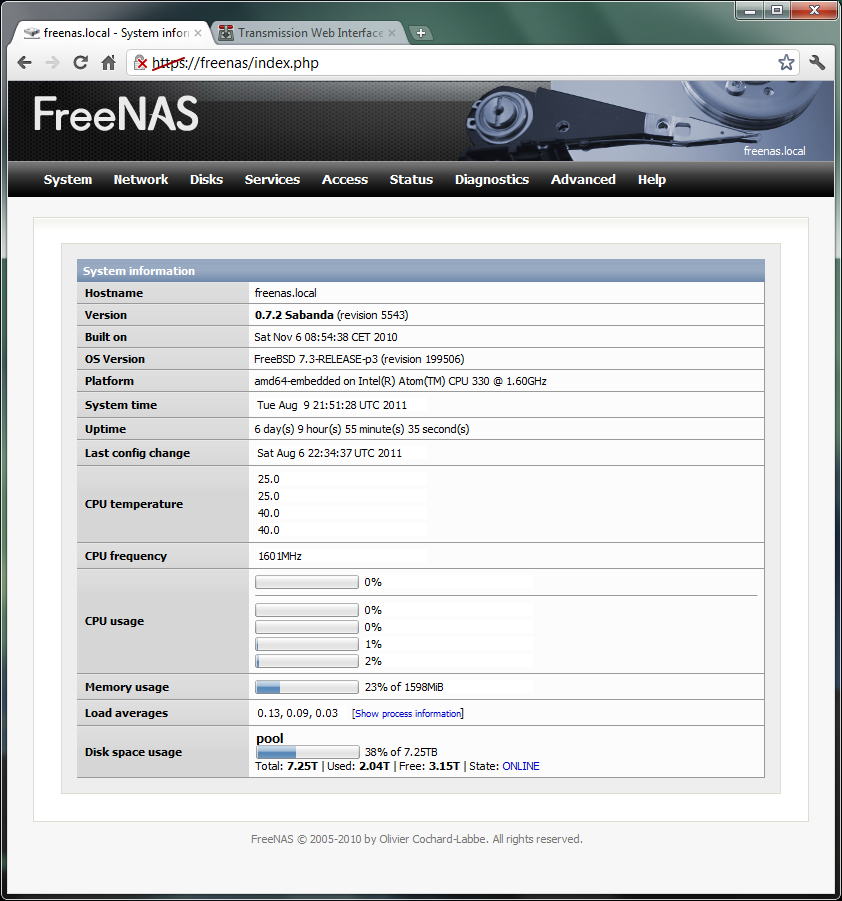
FreeNAS 0.7 main web interface

Lots of extras

FreeNAS should have everything you need from a NAS server:

  • Set up SMB/CIFS, FTP, NFS, and AFP shares
  • Transmission BitTorrent client, with its own web interface (24-hour downloading/seeding!)
  • rsync
  • SSH
  • iSCSI
  • Dynamic DNS
  • DAAP
  • UPnP
  • S.M.A.R.T. monitoring and email alerts
  • Manage users
  • Network interface link aggregation

Version 8?

There was one last decision. Version 8 is a complete rewrite of version 0.7, but many useful features are still missing. Also, I couldn't write a bootable USB image for 8 (although the CD image worked ok in VirtualBox). For now, 0.7 is the only choice.

Performance

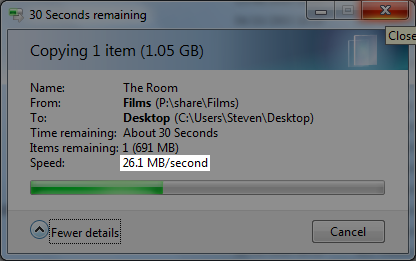
Who cares about how elegant the OS and file system are; more importantly, how fast is it? Well, not great, but not bad. Without any significant tuning, and using SMB shares, I get 20-30MB/s for sustained reads and writes, over gigabit Ethernet:

Copying a file from NAS to laptop

Sadly, it seems that the RealTek NIC (or FreeNAS's driver) doesn't support jumbo frames; the MTU setting in FreeNAS won't budge over 1500 bytes. Wireshark confirmed that no packets exceeded 1500 bytes. But, there is still some tweaking to be done...

What now?

A NAS server is a huge step forward from the horrors of USB external hard drives (or, further back in time, burning DVDs and CDs...) for backups. Aside from filling the NAS with 5.18TB of data, there are minor improvements to look at:

  • Setting up email notification for hard drive S.M.A.R.T. attribute thresholds.
  • Power and temperature improvements form underclocking the CPU, and ensuring that the GPU is powered-down.
  • Improving read and write speeds or, at least, pin-pointing the performance bottleneck.

Other practical notes

  • It's important to note that RAID-Z1 (single-drive redundancy) is not really recommended. If a single drive fails, the strain of resilvering, which may take a long time, might knock out a second drive. All data would be lost. RAID-Z2 provides dual-disk redundancy for this reason. (All of my work and important personal documents are backed-up with Dropbox; the data on my NAS are somewhat expendable.)
  • Although Solaris offers the most up-to-date ZFS support, with features such as de-duplication and snapshots, I didn't plan on needing these and so I was happy to settle for the older version of ZFS in FreeNAS 0.7.
  • The SATA ports in the case are close together, and I was lucky to only have two L-shaped SATA cable connectors; otherwise they would not fit.
  • The case also has a 2.5" hard drive bracket, which is intended to be used for the OS/boot drive.
  • Booting from USB automatically with the ASUS AT3IONT-I motherboard is not obvious. You need to pretend the USB drive is a floppy disk drive.
  • Initially, I toyed with the idea of an integrated NAS and HTPC, but decided that there would be too many compromises; dedicated devices would be far better. For example, FreeNAS is great for ZFS support and other NAS tools, but how would I get a driver for ION-accelerated HD video out of the HDMI port? The hard drives are also too noisy for a HTPC. As an aside, the Boxee Box works really nicely as a dedicated HTPC.
  • btrfs should be great one day when it's ready, but ZFS does the stuff that's important for a NAS now.
10

profile for music2myear at Meta Super User, Q&A about the site for computer enthusiasts and power users

A Super User's Toolbox

For the last 10 years I have been fortunate enough to experience many perspectives on IT support. From the early days cutting my tech teeth on my own first computer running Windows 98 and then Windows 2000 and being too poor to pay somebody else to upgrade the system or repair it for me when my own (or my brother's) stupidity or clumsiness crashed the thing, to being the on-site technical presence as an office assistant in a small not-for-profit, to getting my first "real" IT job for a large-ish not-for-profit doing end user support for 150 on-site users and another 50 remote users, to fixing computer problems for every Tom, Dick, and Harry who came to the service desk at a large electronics retailor, to the white-collar office jobs of the last few years; it has been an engaging, illuminating, educating, frustrating, and ultimately worthwhile pursuit.

While it's not the most glamorous position nor the best paid, end-user IT support occurs at the confluence of two great passions of mine: people and computers, For me it is an incredibly fulfilling job.

But I'd be nowhere without my tools.

I assume every geek has a list like mine: a list of tools, utilities, tricks, gimmicks, black- and white-magik spells that allow you to tame the raging beasts threatening to consume users. Like others, probably, I don't hold my list too tightly. If another tool does a better job, it may easily replace an existing tool. However, even if it does a better job, if it doesn't work the way I want to work or need to work, whichever the case may be, an arguably superior product is not guaranteed inclusion in my toolbox.

Continue Reading…


My tools accompany me wherever I go. They generally reside on several thumbdrives, and I know where to get them so if (when) friends or family ask me for assistance (and I state my price, there's always a price, whether it's a steak dinner next time I'm over, or an extra slice of pie, or $200 for a file recovery), I can download them and get to work.

Each tool has it's own purpose, strengths, and weaknesses, but their overall goal, to me, is that they enable me to meet people's technology needs.

The tools in my toolbox consist almost entirely of file and system utilities. I don't have many network tools that I use with any regularity. This is perhaps a result of my focus on the end user PC rather than on the network that PC may be connected to. I'm no slouch when it comes to setting up networks, but I'll have to refer to google if you ask me about subnets or fishnets.

But enough about the tools, let's get to the tools themselves.

Autoruns from Sysinternals
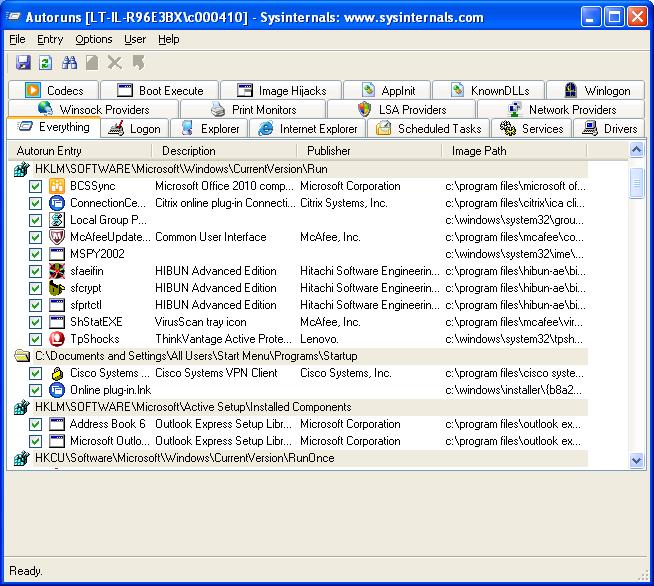
Autoruns: Now you know what's running on my computer. Autoruns: Now you know what's running on my computer.

I don't often sit down at a computer where I do not pull out Autoruns and give it a quick spin. This got me in trouble with my father-in-law back when he was just my girlfriend's dad. First time meeting her family, first morning there, first time sitting down at their oh-so-slow family computer, and helpful little me tried fixing things. Girlfriend's dad was the type who knew enough to be dangerous and no more. Three different antivirus suites vying for supremacy on that computer, to say nothing of the numerous branded camera applications, printer and keyboard managers, and just plain annoying running programs at startup. 10 minutes later the computer was breathing it's first fresh air in a decade and I was in the dog house. Suffice it to say, I learned to touch systems lightly after that unless I had explicit permission, and I still use Autoruns to keep computers running quickly.

Autoruns is handy for aggressively optimizing system performance by controlling start up entries, and it's one of the more thorough utilities out there for this. Do you see those advertisements for computer speed up services that offer online resolution to all your system's ailments? At the very worst I can do 90% of what they claim with Autoruns alone.

If you are not familiar with system startups, with drivers, system services, or how all those cool options show up in your right-click menus, you probably shouldn't use this tool. Ccleaner (elsewhere on this list) has a function for you that gives you fewer ways to completely bollux up your system. But if you need to resurrect a system bogged down under a collapsing weight of detritus and you know your way around a computer, Autoruns should be your best friend.

Even viruses have a hard time hiding themselves from this tool. While it's generally not capable of removing running malware by itself, it is invaluable in that it can show where the files are located and running from, how they're starting, and what type of infection you're dealing with.

Process Explorer by Sysinternals
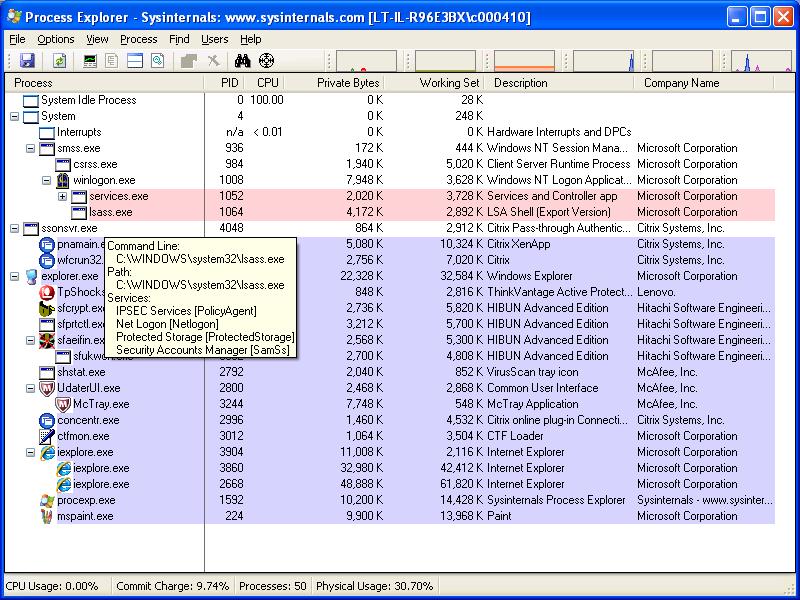
Process Explorer: The oversized 19 year old on the highschool football team. Process Explorer: The oversized 19 year old on the highschool football team.

If Autoruns is msconfig (and then some) on steroids, Process Explorer is task manager on THC.

Ever have that one file that won't delete? That mystery happening that you're not sure which process is spawning? Or did you just like getting details on your Shareable Working Set and I/O Read and Write Delta while peeking at all the network connections of a particular process? Process Explorer is your man, er app.

Used in tandem with Autoruns, you can find the startup entries that need to by bye-bye and then kill their accompanying process. Voila! No need to reboot to experience most of the benefit of the startup manager.

If you just can't figure out what is holding a file hostage, search all the running processes and stacks for any references to that files name or path and then end the offending process and delete the file. Hint: It's probably explorer.exe. And yes, stopping explorer.exe, deleting the file, and restarting explorer.exe will probably not cause any significant damage to your computer.

Process Explorer is also good at giving me a real-time view of processes spawning processes, making it invaluable for hunting down viral traces. Process Monitor also come in handy as a real-time view of anything and everything occurring in the file system and registry. But I find my need for it is limited to special occasions and unique situations that other tools and tricks can't handle. If information on the system and it's processes is what I need, Autoruns and Process Explorer are my go-to tools.

RevoUninstaller
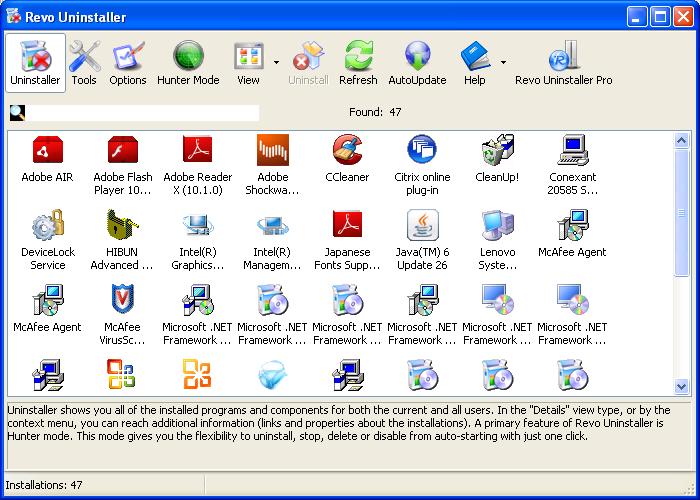
RevoUninstaller: When programs won't go quietly. RevoUninstaller: When programs won't go quietly.

Still along the generic system management and optimization path is RevoUninstaller. I understand there are other tools that do what RevoUninstaller does and more, such as PC Decrapifyer (which wins points on it's name, sight unseen), and I've heard of one Master Uninstaller or something like that. But RevoUninstaller is what I've used for a while now and it does a pretty decent job.

In a nutshell, RevoUninstaller runs a program's built-in uninstaller and then searches the file system and registry (at varying levels of aggressiveness you choose) for any traces of the apps that didn't get removed. It's not perfect. Especially when it comes to app add-ins and multiple apps installed in the same directory in Program Files. It also knows it's own weaknesses pretty well and will warn you if it detects multiple programs are likely to meet it's search criteria (like multiple versions of MS Office on the same computer). So combined with a little common sense, it's another tool I'll break out on any computer I'm working on.

A cool trick of RevoUninstaller (or an annoyance, depending on what you're trying to do) is that it apparently doesn't just monitor the file and registry changes made by the app you're uninstalling through it, but it monitors all uninstaller processes that occur while it's own uninstaller is processing. For instance, if you run the Add/Remove Windows Components (available through the Add/Remove Programs dialog) and remove windows components such as Messenger or Outlook Express or Games while an uninstall is running through RevoUninstaller, when it comes time to show you the files and registry bits it thinks the uninstaller left behind, RevoUninstaller will also show you the files and registry bits the Windows Components Wizard left behind. Generally, this results in more headache than win! But if you've just gotta have Outlook Express totally removed, this is how it's done.

CCleaner by Piriform and Cleanup! by Steven Gould
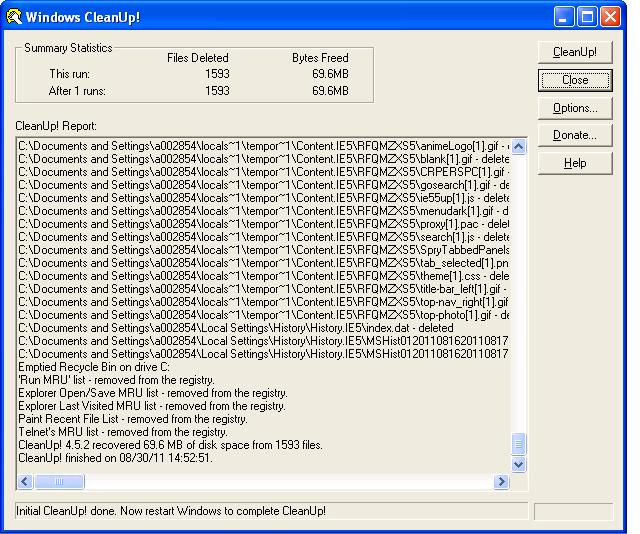
Cleanup: Tasty temp files! Om nom nom Cleanup: Tasty temp files! Om nom nom!
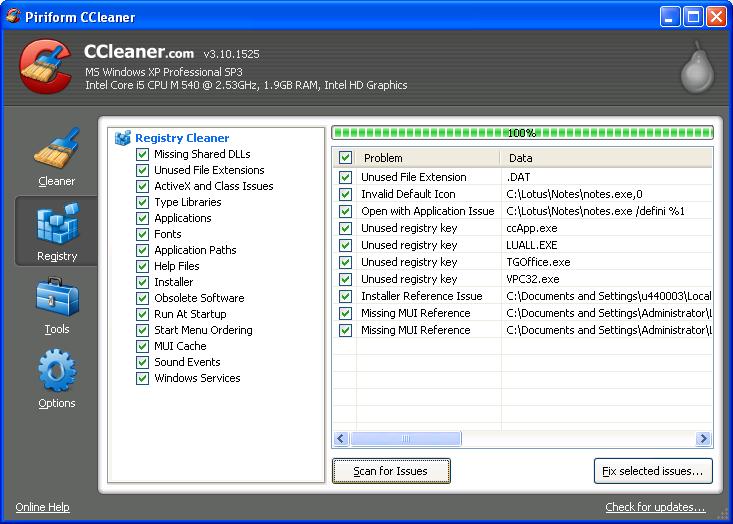
CCleaner: When using a sledgehammer is inadvisable. CCleaner: When using a sledgehammer is inadvisable.

The last tool I run on just about ever system I touch is either CCleaner by Piriform, or Cleanup! by Steven Gould.

Cleanup has been a long-time favorite mainly for two reasons: It makes a fantastic flushing noise when you run it that'll make every head in the office turn, and it cleans temporary files in all user accounts you have access to in one fell swoop. This second feature means you must be careful what you clean. If you've got admin on the box (and what self-respecting tech working on a random computer hasn't established a temporary admin account from which to do their repairs), say goodbye to any MRU lists or cached files that the users were so dependent on. There'll be a minor heart attack when they find their favorite website isn't popping down in the address bar because it was listed in an MRU list and not saved as a favorite. I did that to the personal computer of the director of a major hospital. A shipment of used hospital gowns showed up on my doorstep the next day.

When the task calls for a more delicate touch, CCleaner comes in handy. While you cannot remove temporary items from any user accounts besides the one you're logged in with, you're also not removing any friendly familiar interface stuff from the other accounts. Plus, CCleaner has a decent registry cleaner that is quickly becoming a standard process for me immediately following any cleaning by Autoruns and RevoUninstaller.

A cool feature of CCleaner is that it can be preconfigured and scripted. By setting your desired options and then running the executable using the command:

ccleaner.exe /auto

...you can automate a cleanup process. In order to make a safe, user-runnable, single executable, just package ccleaner.exe and the batch script using iexpress and set the package to extract silently, run the batch script, and then delete the extracted files upon completion. What you end up with is small executable that runs a preconfigured CCleaner without any user interaction. No need for walking users (or parents, uncles, aunts, etc) through selecting the right options in an overly powerful program and then hearing "oops" over the phone.

These 4-ish tools are used nearly every day. From doing a hard uninstall of Adobe Reader 10, which at version 10.1 decided it likes to crash each and every time it starts unless you remove it and then reinstall using not the 10.1 patch, but the full 10.1 installer, to addressing random errors and finicky interface issues, to "speeding up" the system of the one user in the office who always complains about how slow their computer is and giving that person one less excuse before they're fired for their own laxadaisical habits. It's fun taking away excuses from lazy people, and it's good sense to make sure everybody you support or help can get the most from their computer.

There are a few more tools I've found especially handy in specific situations and so they find themselves on my thumbdrive as well.

NOD32 by Eset

It used to be that NOD32 by Eset could be modified into a portable package that could even be updated from a full installation resulting in a powerful AV tool that could fit on and run from a thumbdrive. This tool has been on my thumbdrive since 2004, when it was incredibly handy for running virus scans on customer boxes at the electronics store. I'd usually start by running the computer in safe mode, plugging my thumbdrive in, and copying the NOD32 tool as well as AV tools from Trendmicro and Stinger by McAfee, Autoruns, Process Explorer, and Cleanup. Then I'd run all the tools in safe mode once or twice, then again in normal mode a couple more times. Then if the infections were still down in there, I'd slave the hard drive in another computer and run aggressive scans from there. It took a while to do, but because I'd start the scan and then work on other systems while the scans were running, it wasn't that bad a setup. And it worked really well.

My personal record regarding viral cleanup was a custom rig brought in by a guy whose sons had installed nearly every file sharing program available. The kids had installed eMule, eDonkey, Morpheus, Napster, Gnutella, Limewire, a couple early torrent apps, and probably a few other P2P programs I've forgotten. None of the infections were particularly terrible, mostly the standard "create a million copies of files with interesting pr0n names andput them in every directory imaginable" viruses. But more than 90% of the files on the computer were viral. There were more than 800,000 files on that computer when we got it and fewer than 18,000 when we gave it back. Still working even. I took the opportunity to tell the dad that he was perfectly within his rights to inform his sons they were not allowed to touch his computer. They were mid-teens and could get jobs at McD's to buy their own computer. He's just lucky I didn't add an extenuating circumstances fee to his service charge. After all, he paid just over 1/100th of a cent per file we removed.

Cleanspl

Cleanspl, part of the Server 2003 (and following?) Resource Kit, works on non-domain systems as well, and I've found it handy for cleaning recalcitrant printer drivers (cough HP, printer drivers don't need to be more than 500MB cough) and for those odd times that Adobe Acrobat decides it really just wants everybody to (not) get along.

But I know these aren't all the tools out there. And I know it is highly likely they aren't the best tools at what they do out there. And I know that y'all probably have tools that are indispensable to you, or you encounter situations that are different from my own in which the tools I use are inadequate to your experience. In the best spirit of geekdom, I still want to learn. I want to discover and find out and progress and grow. And in some small way, this means finding new tools.

So what are your tools and what do you use them for?

4
  • 2
    Glad to see you submitted this!
    – nhinkle
    Commented Aug 31, 2011 at 22:20
  • 1
    I submitted the article to the blog, and then noticed the expectation was that I'd paste it here for the competition. So this was a bit of a scramble. Thanks for the help and encouragement. Commented Aug 31, 2011 at 22:34
  • 1
    "Process Explorer: The oversized 19 year old on the highschool football team." That made me laugh... Commented Sep 1, 2011 at 16:16
  • @music2myear: you should include this Sysinternals installer/updater script also. blogs.technet.com/b/elevationpowertoys/archive/2010/02/26/…
    – surfasb
    Commented Sep 12, 2011 at 0:57
8
profile for berk98 at Super User, Q&A for computer enthusiasts and power users

#5 Ways of Finding the Right Power Supply#

Selecting the right power supply is often the last thing people think about when building a computer. However, it is something that deserves substantial consideration. Although spending more on a quality power supply won't increase your computer's performance, it would be one of your best investments, because a power supply failure can take the rest of your computer with it. Furthermore, a decent unit will not need to be replaced when newer parts are installed in your computer.

##1: Do your research## Power supply quality varies greatly among manufacturers, and even among units from the same manufacturer. Determine the company who actually manufactured the unit, rather than the company who put their brand on it, and make sure they are a reliable company. For example, Corsair units are usually made by either Seasonic or Channel Well, who both make decent units. On the other hand, Allied units which come with some computer cases are made by Solytech, who has been known to make ticking time bombs. This information is usually available by looking up the UL certification number, but often times more research is necessary.

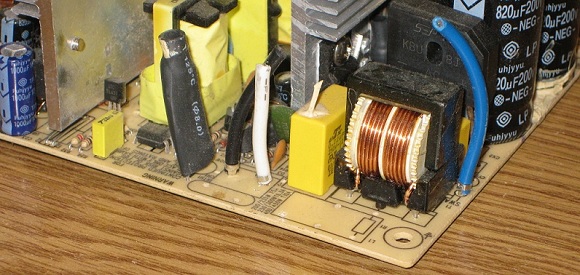
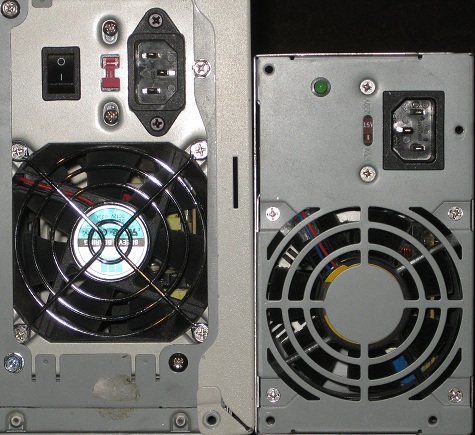
Low-Quality Power Supply with Yellow PCB
(source: notgeek.net)

Another way to determine power supply quality is from opening the unit up. Quality units will have a green PCB, rather than a beige-yellow one (pictured above). They also have quality capacitors rated for high temperatures, and dedicated protection circuitry. Although the average computer probably isn't inclined to void their warranty, many power supply reviews contain teardown pictures, as well as expert opinions.

In either case, Tom's Hardware published a great article with information on how to determine your unit's quality, as well as a table of manufacturers. It is a great resource for determining power supply quality, and a good read.

http://www.tomshardware.com/reviews/power-supply-oem-manufacturer,2913.html

Quality Fan Grille compared with Cheap one
(source: notgeek.net)

Finally, the power supply's fan grille is a good indication of quality. A fan grille stamped out of metal is a good indication that corners have been cut, since it is the cheapest style of fan grille. The left fan grille pictured above is a quality unit, while the right one is a cheap model.

##2: Find a power supply with the 80 Plus designation## 80 Plus
(source: plugloadsolutions.com)

80 Plus Bronze
(source: plugloadsolutions.com)

80 Plus Silver
(source: plugloadsolutions.com)

80 Plus Gold
(source: plugloadsolutions.com)

80 Plus Platinum
(source: plugloadsolutions.com)

Even if power consumption from the wall isn't much of a consideration, the lost energy is turned to heat, necessitating higher velocity fans, resulting in a louder unit. Power supplies bearing the 80 Plus designation and logo have been tested by an independent company who ensures the power supply meets efficiency requirements (80% efficiency at 20%, 50%, and 100% load).

Multiple ratings exist for better efficiencies, although there is little difference between designations. Higher ratings can indicate newer/better units, such as the 80 Plus bronze/silver rated Corsair HX series from 2009, compared to the 80 Plus gold rated Corsair AX series from 2011.

##3: Avoid power supplies with multiple 12v rails.##

These rails are usually just separate over-current protection units operating from the same 12v source. While they don't necessarily decrease the efficiency of the power supply, they do make it more difficult to access the 12v current.

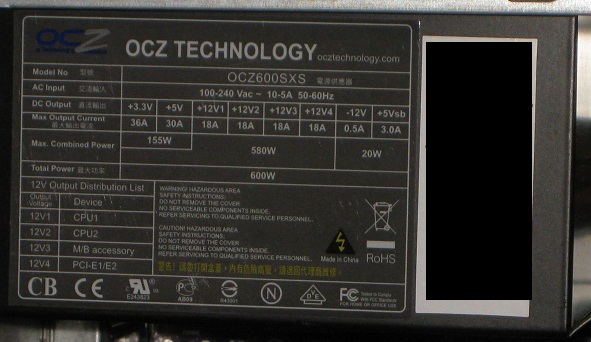
OCZ 4-rail unit label
(source: notgeek.net)

For example, the OCZ600SXS unit is a quad-rail design (pictured above), with two rails to each half of an EPS12v (2x4 pin) CPU connector, one rail to the PCI-e, and one to the motherboard/peripherals. This means that if it were used on a motherboard with an ATX12v (2x2 pin) CPU connector, an entire rail would be lost. Furthermore, even if a very power-efficient CPU (such as a Core i5-2390T) were used, high end graphics cards and multiple graphics card setups could have trouble getting sufficient power.

While most multiple rail power supplies only have two or three rails, it can still prove to be problematic, particularly if one peripheral (such as a graphics card) draws significantly more power than the rest of the system.

##4: Read the label!##

Checking the power supply wattage is not enough. Make sure that most of the current is available from the 12v output. Modern systems draw the most power from the 12v line. Since this wasn't always the case, many older designs provide most of the power on the 5v or 3.3v lines, which does no good for modern systems.

For example, consider a Logisys PS480E12 480W power supply, and a Thermaltake TR-380P 380w power supply. While the Logisys unit is rated at a much higher wattage, its 12v current rating is just 16A, whereas the Thermaltake 12v rating is 30A. Therefore, despite the lower power rating, the Thermaltake unit is much better suited for modern computers.

##5: Buy a power supply sufficient for your needs, and no more.##

Although the market is flooded with high current power supplies, you might be surprised at how little power your computer requires (A quad-core i5-2400 and GTS 450 can require as little as 300 watts).

Furthermore, efficiency of power supplies significantly drops under light use, which is why 80 Plus power supplies aren't rated for less than 20% loads. While the increase in power consumption may be minimal, higher-wattage power supplies will still get hotter, necessitating more airflow.

OuterVision eXtreme publishes an extensive power supply calculator utility for free, which can give you a great idea of how much power your system needs. The paid version will also tell you how much current on each voltage you should look for.

Feel free to plan for future upgrades. But if you don't expect to be running large hard drive arrays or multiple graphics cards, don't waste your money on an overly powerful power supply.

eXtreme PSU Calculator: http://extreme.outervision.com/PSUEngine

2
  • 1
    It's not exactly 5 ways, as they don't work that well on their own. 5 Steps maybe?
    – Daniel Beck Mod
    Commented Sep 7, 2011 at 17:24
  • @Daniel: Or five 'Five things to consider when...'
    – paradroid
    Commented Sep 14, 2011 at 16:36

You must log in to answer this question.

Not the answer you're looking for? Browse other questions tagged .