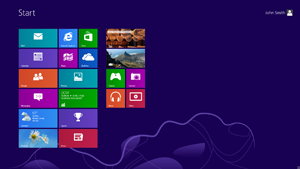
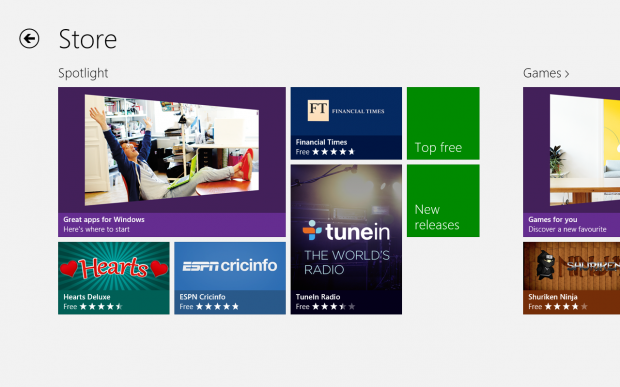
27

enter image description here

Winners will be announced on the Super User Blog shortly.


Please read

So you've submitted your blog post... Now what?

for guidelines on how to bring your Windows 8 Challenge blog post to http://blog.superuser.com.

Please note that our blog is not limited to contestants, so everyone is welcome to write something.


This meta post was designed for you to submit your Windows 8 blog posts.

These blog posts MUST meet the following criteria:

  • Be about or related to Windows 8
  • Must be your own creation & not a re-write of another blog post from either the Superuser blog or any other publicly available blogs. (This includes content from your own sites or blogs. In other words DO NOT COPY PASTE ANY PUBLICY AVAILABLE CONTENT EVEN IF IT'S YOUR OWN)
  • Must not infringe upon any copyrights or trademarks
  • Must not be vulgar, crude, or derogatory in any manner. This is a technical and not a trolling blog

These rules will be heavily moderated by moderators and myself (Kronos). Also, vote up your favorite ones. All suitable posts with positive votes will be published!

Some great examples of blog posts

Below are some great blog posts that we've created thus far. They are the highest viewed ones, and some have even been featured in Lifehackers blog. Use them as examples and inspirations on how to make your blog posts shine.

If you have any questions you can contact me through comments, ping or email (superuser [dot] kronos [at] gmail [dot] com)

Note: We reserve the right to update or change these rules at any point before, during or after the contest. (This is mainly if I forget something or if the wording doesn't seem right)


Currently submitted posts in chronological order:

25
  • 3
    Examples on how blog post answers to this topic could look like, from a previous contest.
    – Daniel Beck Mod
    Commented Oct 23, 2012 at 5:31
  • I'm confused. We write a blog post as an answer and this contest is for? Is there a prize?
    – Earlz
    Commented Oct 25, 2012 at 15:12
  • @Earlz Click the link at the top to go to the contest. This is the Write a blog post about Windows 8 part of it, in the Tile Challenge section at the end.
    – Daniel Beck Mod
    Commented Oct 26, 2012 at 5:48
  • 2
    Do we get confirmation that our blog post is suitable? Commented Oct 26, 2012 at 8:48
  • I composed an article over on the blog itself before realizing that you wanted it pasted as an answer here. Should I paste the contents of the article here? Or should I publish the article and paste a link here? Commented Oct 26, 2012 at 21:06
  • @GeorgeEdison I would paste it into here for now as this is what everyone else well be doing. Commented Oct 28, 2012 at 17:53
  • @GeorgeDuckett I will talk to the developers about this, however, my gut feeling is that the 'tile' won't be lit up unless I give them the ok, as this is a very hard thing to track automatically. Commented Oct 28, 2012 at 17:54
  • @KronoS: Ok, I figured it wouldn't be automatic. Really I was just after a yes, this blog post is ok to be included. I see you commented on superuser's post, I assume the lack of one on mine means it's ok? Commented Oct 28, 2012 at 19:07
  • -1. This smacks way too much of an advertisement for Win8 for my taste. An ad banner for the challenge site across the superuser main page and search result pages? Maybe I haven't been around long enough, but I've never seen one of those for a new version of, say, Ubuntu. Yes, superuser.com is also about OSs, but this seems to me to be an inappropriate way of getting our posters to bang the MS publicity drum. Commented Oct 30, 2012 at 0:34
  • @aaamos you're welcome to your opinion, however this isn't the official post for the contest, but rather just for the blog posts. If you have issue, then feel free to post on Meta.SU. Finally, just as an FYI, AskDifferent with release of new Mac OS, Arqade with release of Diablo, and other have had contests of similar fashion, so we're not that different. Commented Oct 30, 2012 at 15:28
  • I kind of agree with @aamos, but I also think this is a great way to promote knowledge about Windows 8. Rather than remove this contest, I would like to see similar contests for new versions of OSs as well. Commented Nov 2, 2012 at 2:52
  • 2
    There's also the fact that the Windows 8 release is probably drawing a little more attention from the general public than the most recent Ubuntu release. No hate for Ubuntu, just saying I think we all know what's a "bigger deal"...
    – rtf
    Commented Nov 2, 2012 at 22:42
  • Some of these posts are quite long, making it difficult to browse through the list. Can we have a way make that easier? Commented Nov 5, 2012 at 15:42
  • @JoelCoehoorn Slhck has created an index within the question. There's not really any other way that I can think of to navigate these. Commented Nov 6, 2012 at 15:09
  • I see that a lot of people are downvoting posts without giving any reason whatsoever! Please do write a comment justifying your downvote so that we learn and improve.
    – Mamta D
    Commented Nov 8, 2012 at 8:05

12 Answers 12

11

5 Tips for Getting the Most out of Windows 8


Today the newest iteration of Microsoft's flagship product, Windows 8, arrives on store shelves. As was the case with Windows 7, this version of Windows has been available for testing (free of charge) for the last few months. Because of this, a very large number of users have already had the opportunity to experiment with Windows 8 and therefore you will find a wide variety of blog articles describing the new changes in detail.

When OS X Lion was released, our friends over at Apple.SE created a question "What tiny thing in Lion makes you smile or has caught you off guard?". The idea behind the question was to highlight an overlooked or little-known feature in the new operating system. The tips below certainly don't describe undocumented or "hidden" features - but hopefully they make your experience just that much more enjoyable.

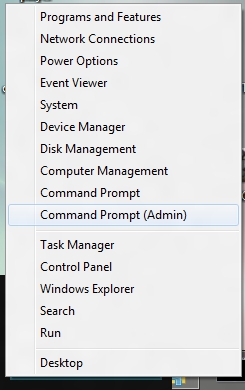
Tip 1: Right-click the Taskbar

I've found it to be a bit of a chore to get at certain administrative utilities through the Metro interface and even the Control Panel. I was pleasantly surprised to discover that I can access some of them simply by right-clicking the area at the far left of the taskbar.


(source: superuser.com)

As you can see, the menu contains entries for launching an administrative command prompt (which I frequently use), getting at the Device Manager, etc.

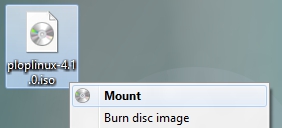
Tip 2: Directly Mount ISO Files

It gets even better - not only are ISO files supported, but VHD disk images are as well. VHD files are typically used by virtualization tools, such as Microsoft's own VirtualPC and VirtualBox. The ability to open an image without booting up a large virtual machine is invaluable. Simply right click an image file and click "Mount".


(source: superuser.com)

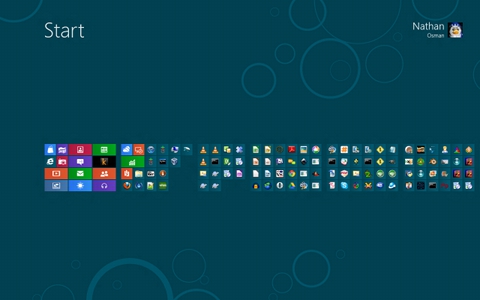
Tip 3: Get a Bird's-Eye View

If you are using a desktop computer and finding it difficult to navigate the Metro interface because you have so many applications installed, then this tip is for you. After pressing the Windows key, hold down the control key and roll the scroll wheel on your mouse.


(source: superuser.com)

This will "zoom-out" and give you a much broader view of the icons and applications that are listed.

Tip 4: Refresh Your PC

Windows 8 is capable of reinstalling itself while leaving your personal files intact, which can be very helpful if you want a clean start without the regular hassle that accompanies a complete reinstallation. You can get at this tool by launching the Metro interface, typing "refresh", and clicking Settings.


(source: superuser.com)

In fact, you can even take a "snapshot" of your computer's current state (including drivers, applications, and settings) and have Refresh use that snapshot when it performs the reinstallation. This article details that process.

Tip 5: Keep an Eye on Resources

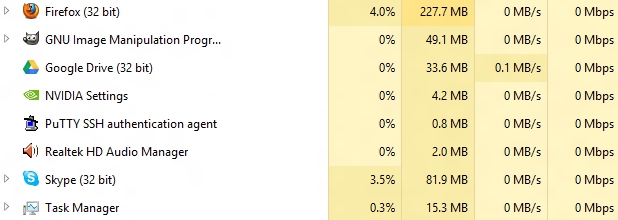
Have you ever noticed the hard drive access LED stay lit for a long period of time and wonder what was going on? Although there are (and have been) third-party tools for figuring out which apps are at fault, Windows 8 now presents this information to you in the new redesigned taskbar. Simply right-click an empty area of the taskbar and click "Task Manager". You might have to click "More details" to show all of the tabs.


(source: superuser.com)

You can see an immediate breakdown of each individual app's resource usage. You can easily determine which app is responsible for all of the disk I/O by clicking the disk column to sort the rows by disk usage.

5

Try out without affecting your current setup.

Following these simple (if a bit long) steps you will be able to test out Windows 8, either the RTM ISO file, or the full version of Windows 8 on a DVD on your windows PC, using a virtual machine. The advantage of this is that it will leave your existing installation of windows alone. For this blog I'll do this by using the publicly available windows 8 RTM ISO image and the free (for non-commercial use) VMPlayer. Not much changes in the case of a Windows 8 setup DVD.


First download the ISO image (if needed).

Go to the microsoft download page here: Windows 8 evaluation for developers

At the bottom you'll find appropriate links based on whether you want the 32 or 64 bit version, click the appropriate image.

You'll be asked to sign into your microsoft account, then you'll have to fill in a short online form, which will hopefully be mostly filled out already.

Once you submit that you should start downloading the ISO file. You'll also get a nice email from microsoft.

While that is downloading lets get the next thing we need, VMPlayer, which is free for non-commercial use.


Download VMPlayer

Get that here: Download VMware Player

I'm assuming you're running a version of windows, so the first option is what you want; the exe.

That shouldn't take too long to download so lets install VMPlayer while we wait for the iso file.


Installing VMPlayer

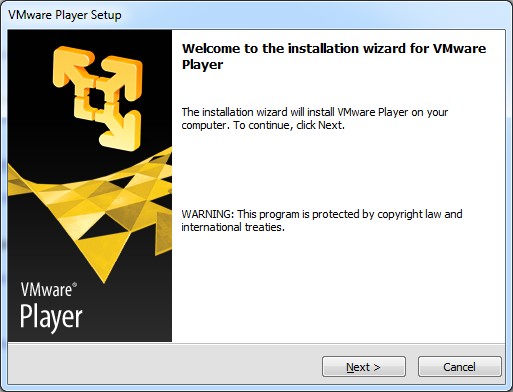
Launch the installer downloaded earlier.

enter image description here

Click Next.

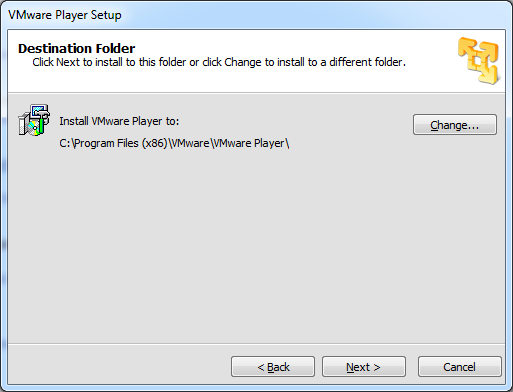
Choose where to install it.
NOTE I had problems installing Windows 8 on a virtual machine stored on a different hard disk to my VMPlayer install, so I suggest you install VMPlayer to a hard disk with a lot of space.

enter image description here

Click Next.

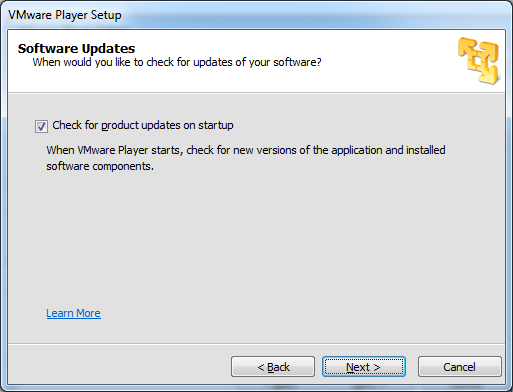
Choose whether you want updates:

enter image description here

Then click Next.

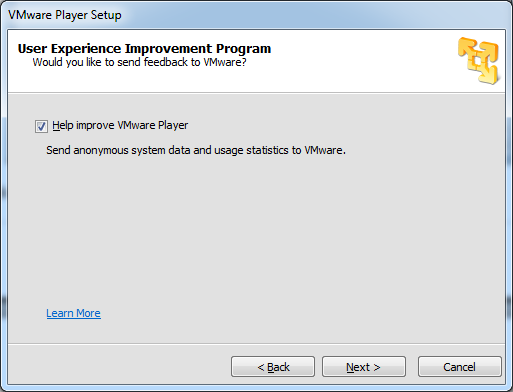
Choose whether to send usage statistics:

enter image description here

Click Next.

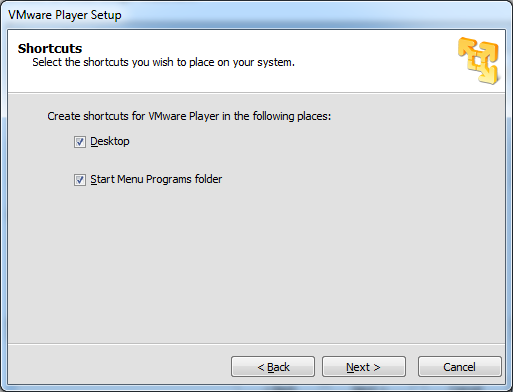
Choose whether to create short-cuts:

enter image description here

Click Next.

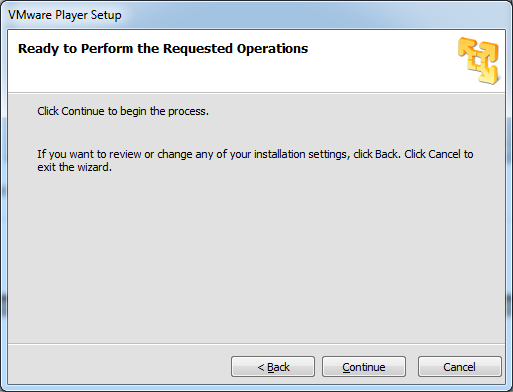
Start the installation:

enter image description here

Click Continue.

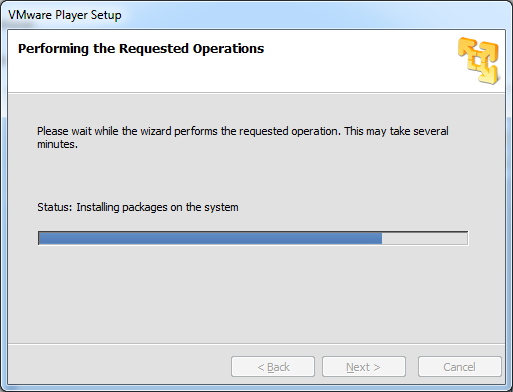
Wait for it to install:

enter image description here

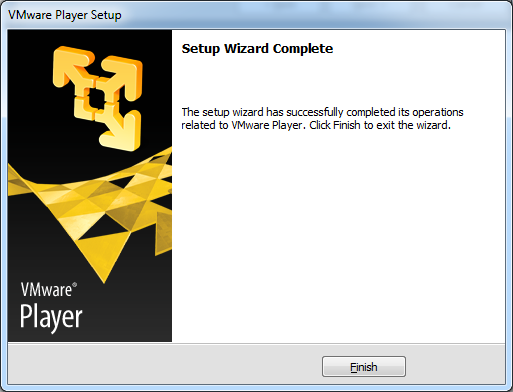
VMPlayer is now installed:

enter image description here

Once the ISO is done we're ready to go!
Obviously if you're using a DVD then off you go straight to the next step. :)


Setting up a virtual image of the windows installation.

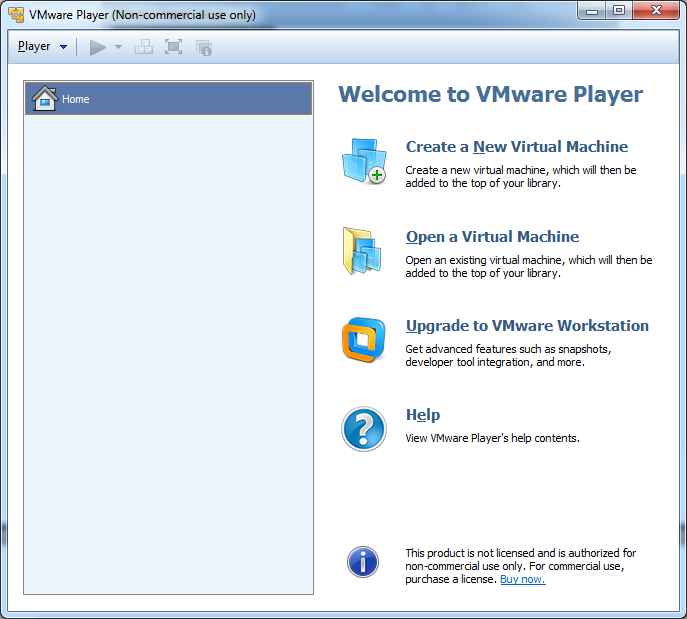
Run the newly installed VMPlayer.

enter image description here

Choose "Create a New Virtual Machine"

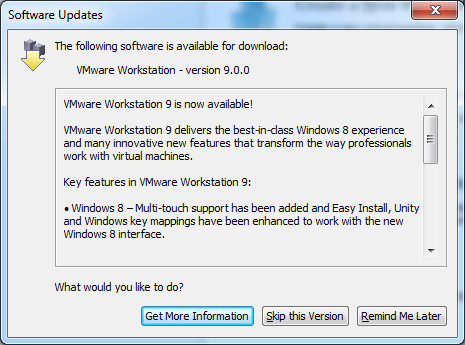
While you're doing this you might get the following screen popup, we can ignore that so click Skip this Version.

enter image description here

Back to setting up the virtual machine...

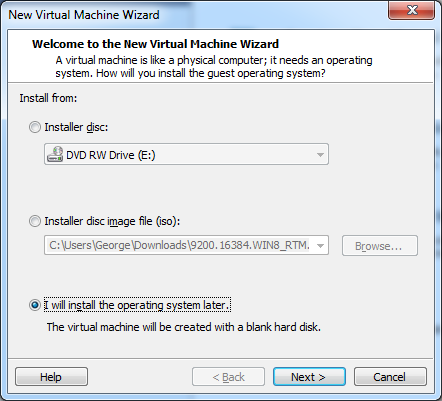
Choose where to install the VM from, in our case we want a blank virtual machine:

enter image description here

Click Next.

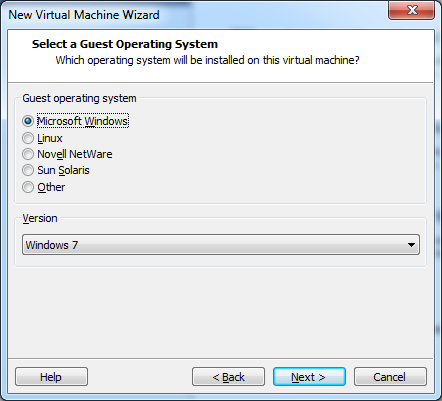
The operating system we want initially is windows 7 (we'll install windows 8 within the VM):

enter image description here

Click Next.

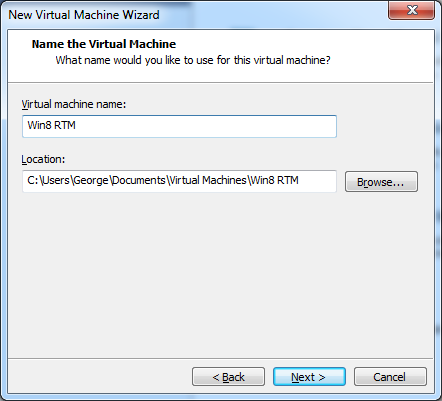
Name your VM and choose where to store the file (keep in mind it'll be around 60GB, or larger if you prefer).
NOTE I tried to put the VM file on a different hard disk to the VMPlayer install folder which caused problems during windows 8 setup so I recommend you stick to the defaults if you can.

enter image description here

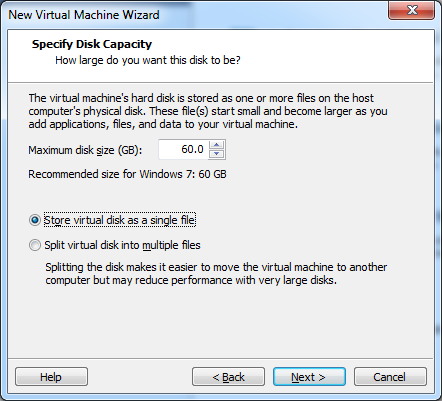
Specify the disk size, i've kept the default 60gb, choosing to store it as a single file:

enter image description here

Click Next.

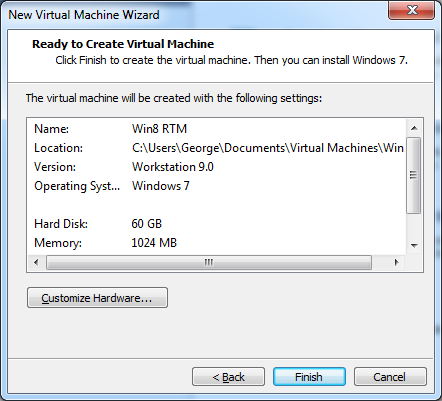
We want to customise the hardware, upping the memory and setting up the virtual CD/DVD drive.

enter image description here

Click Customise Hardware.

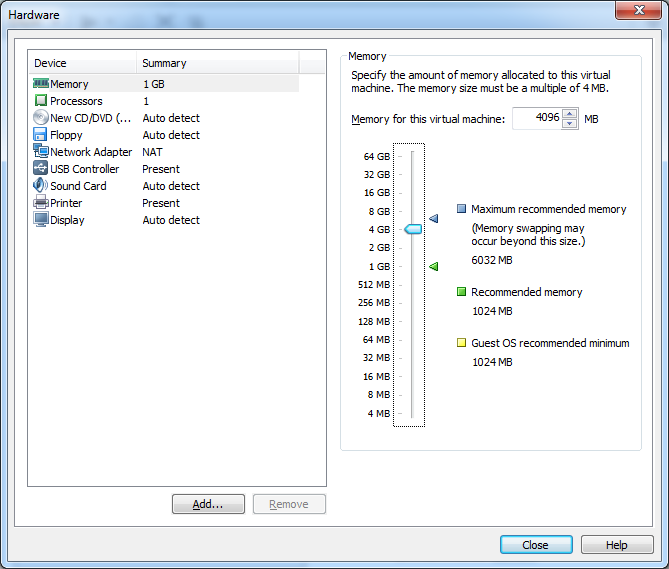
Choose 4GB of RAM:

enter image description here

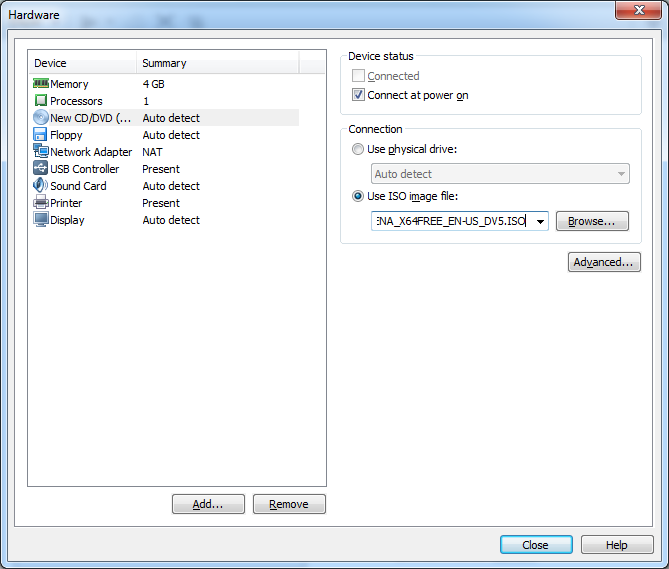
Now we need to tell it about our setup ISO file Click CD/DVD and set it to use the ISO file, or the physical drive with your Windows 8 setup DVD:

enter image description here

You can also fiddle with other things if you like, but I've left the rest as the default. Click Close, then Finish.

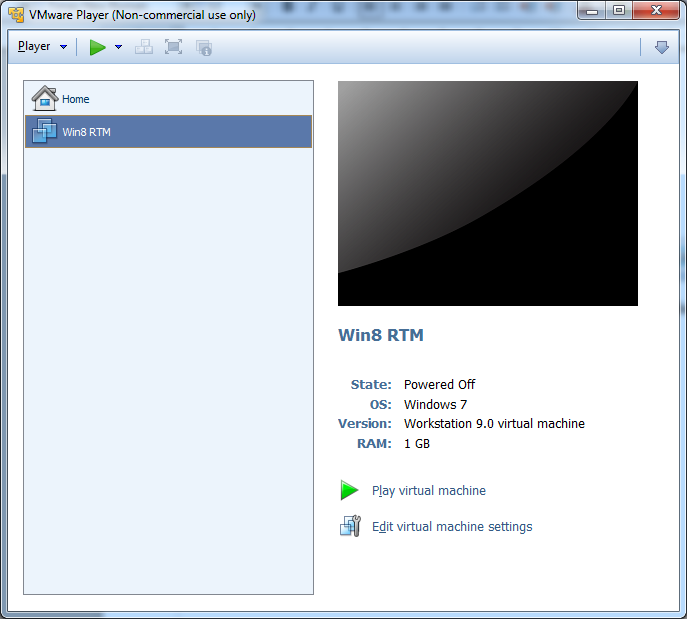
Now we have our VM turned off with a basic OS to load the Windows 8 setup DVD:

enter image description here


Installing Windows 8

We're now ready to boot up the virtual machine and start installing Windows 8.

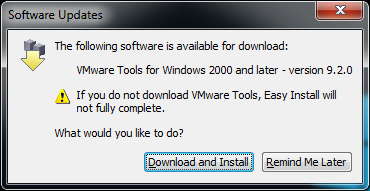
As that is happening you might need to download Vmware tools, as below:

enter image description here

The UAC thing will popup, as its installing something, so allow that then wait for the install to finish.

enter image description here

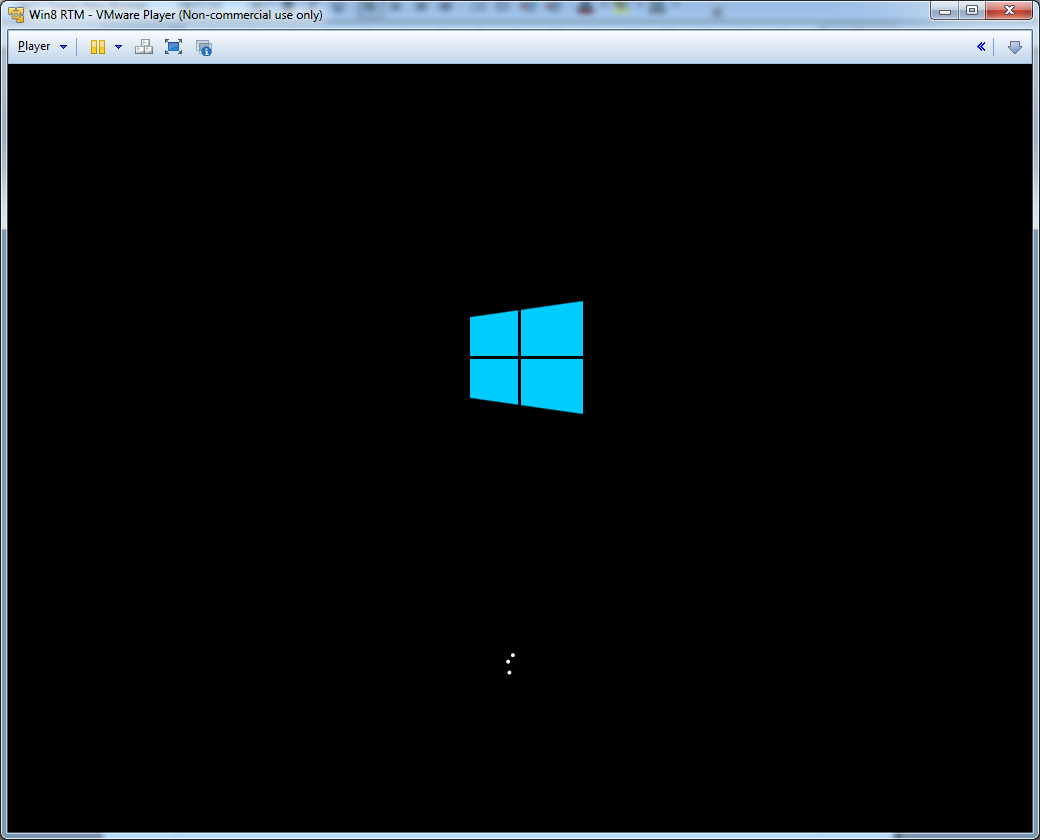
You'll see the VM loading the windows 8 setup:

enter image description here

Now we're into the normal windows 8 setup process.

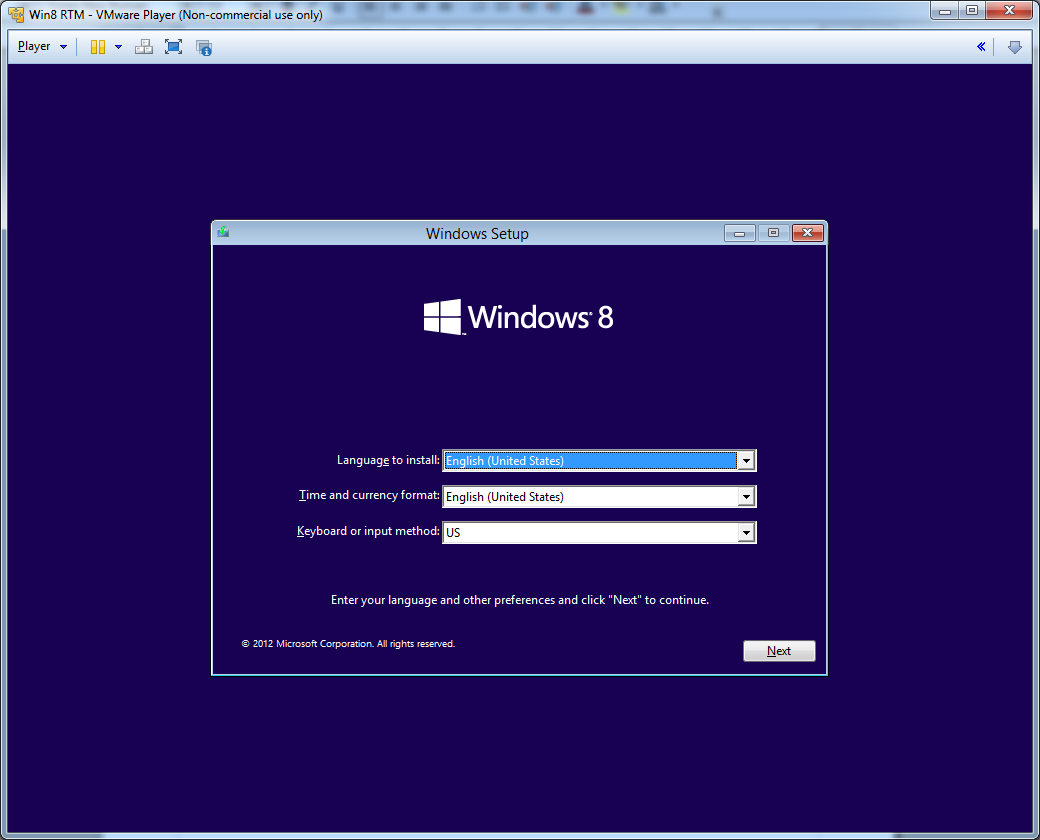
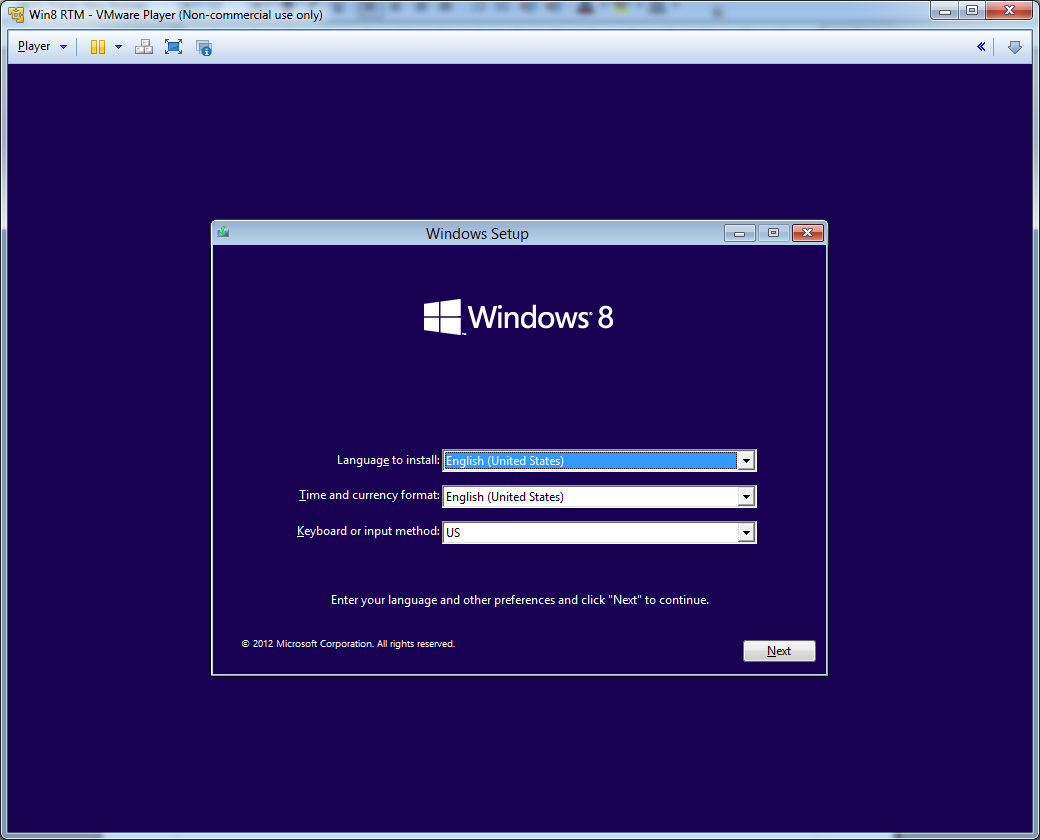
You don't get a choice of install language, but you can set the time/currency format and keyboard or input method as appropriate:

enter image description here

Click Next.

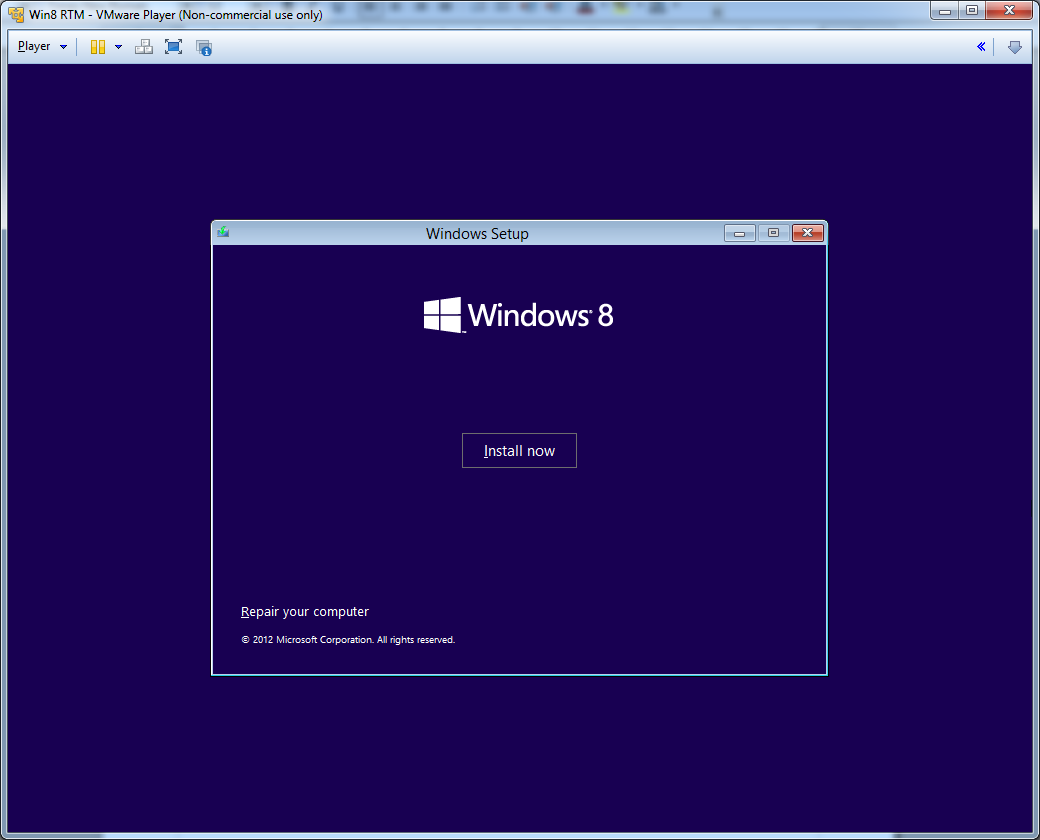
enter image description here

Click Install Now.

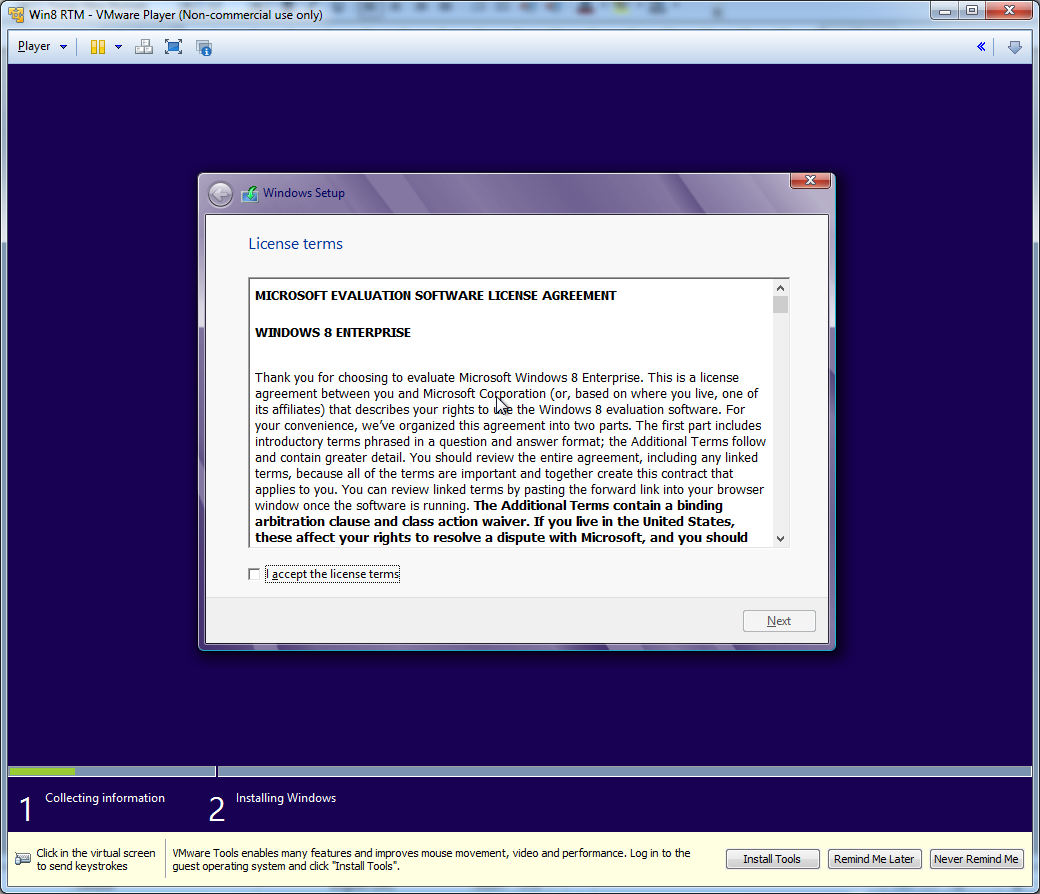
After a short break you'll have to accept the license terms:

enter image description here

So, click the box and click Next.

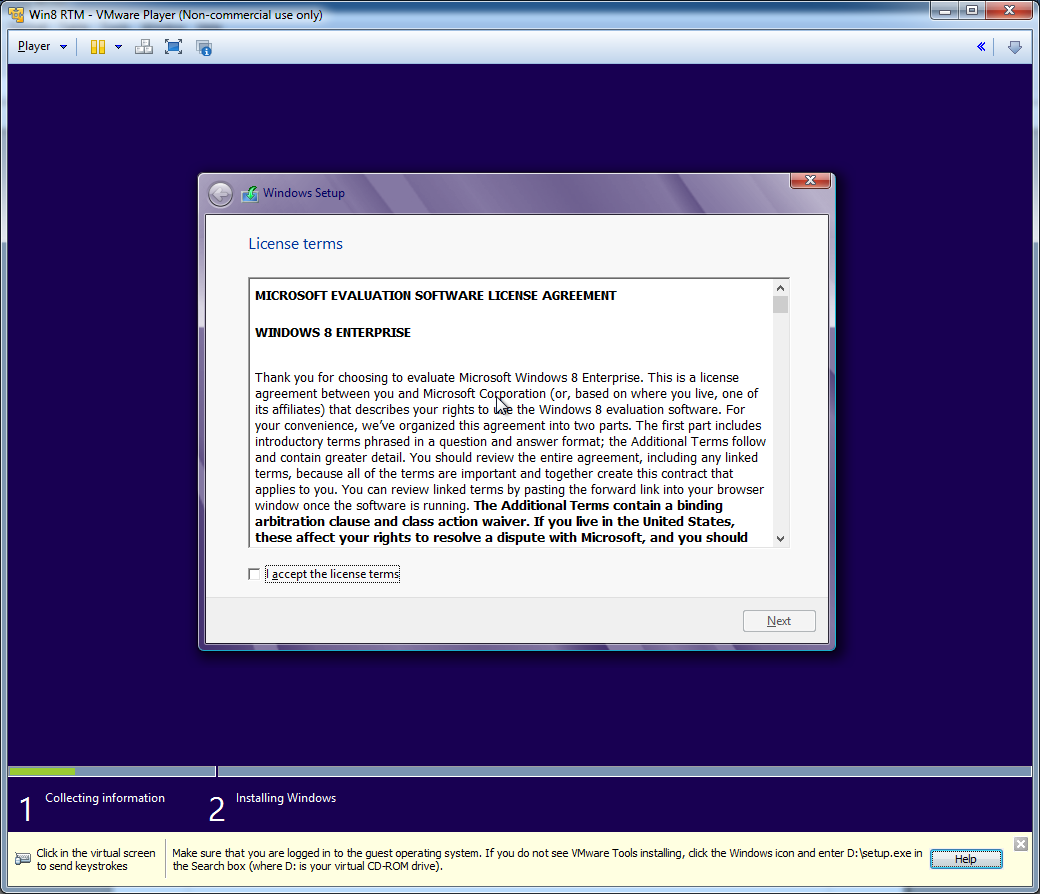
While we're here you can go and install the Vmware tools if you want. If so, click Install Tools.

enter image description here

If you do this before you log into windows it'll give you the message as above and will wait until we've installed windows before installing the tools.

So, back to the windows installation.

enter image description here

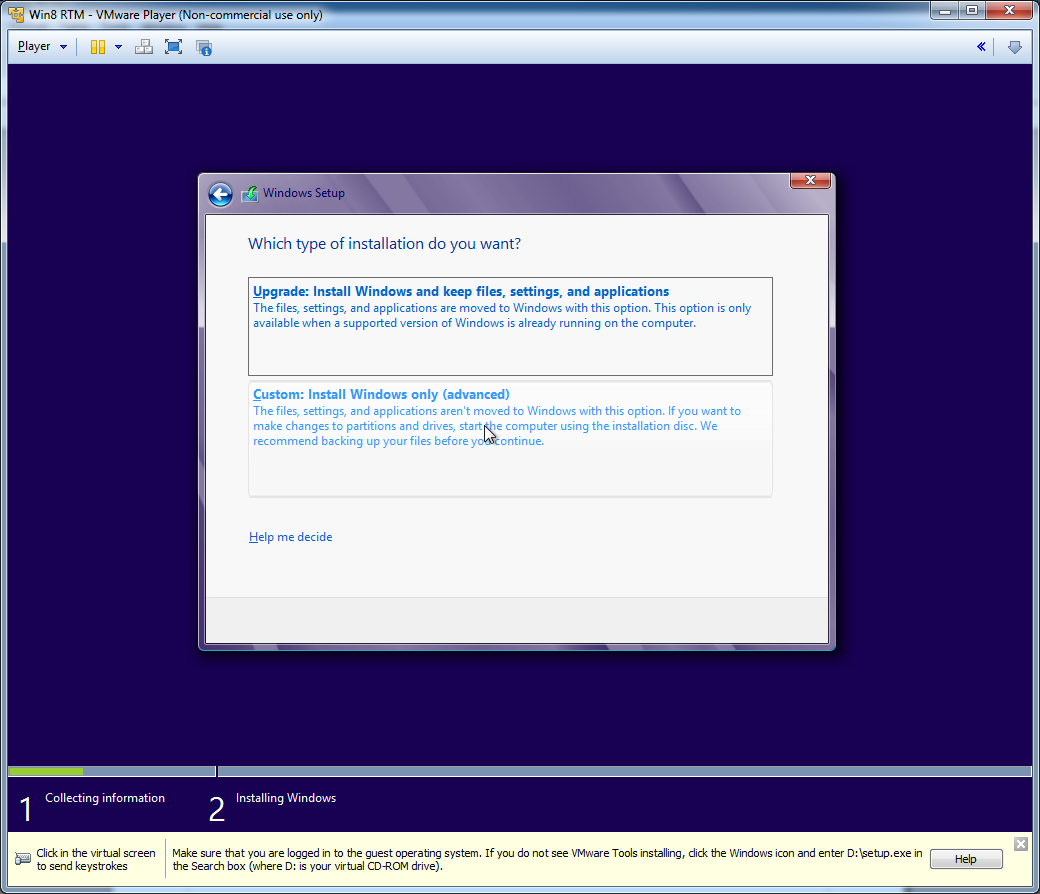
We want a custom install, since in the VM there are no files etc. to keep.

Click "Custom: Install Windows only (advanced)".

The message below is the error I got when creating the VM file on another hard disk, so if you don't get that then good! If you do get the message below, try creating a new virtual machine.

enter image description here

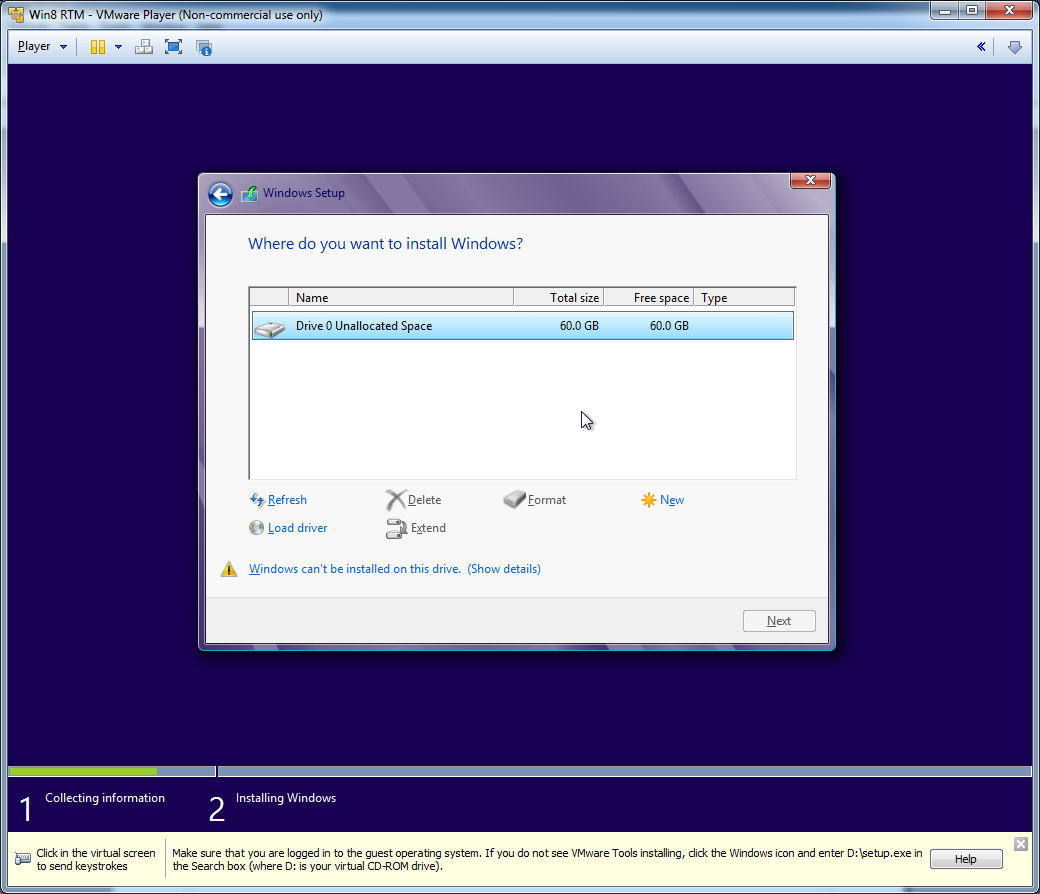
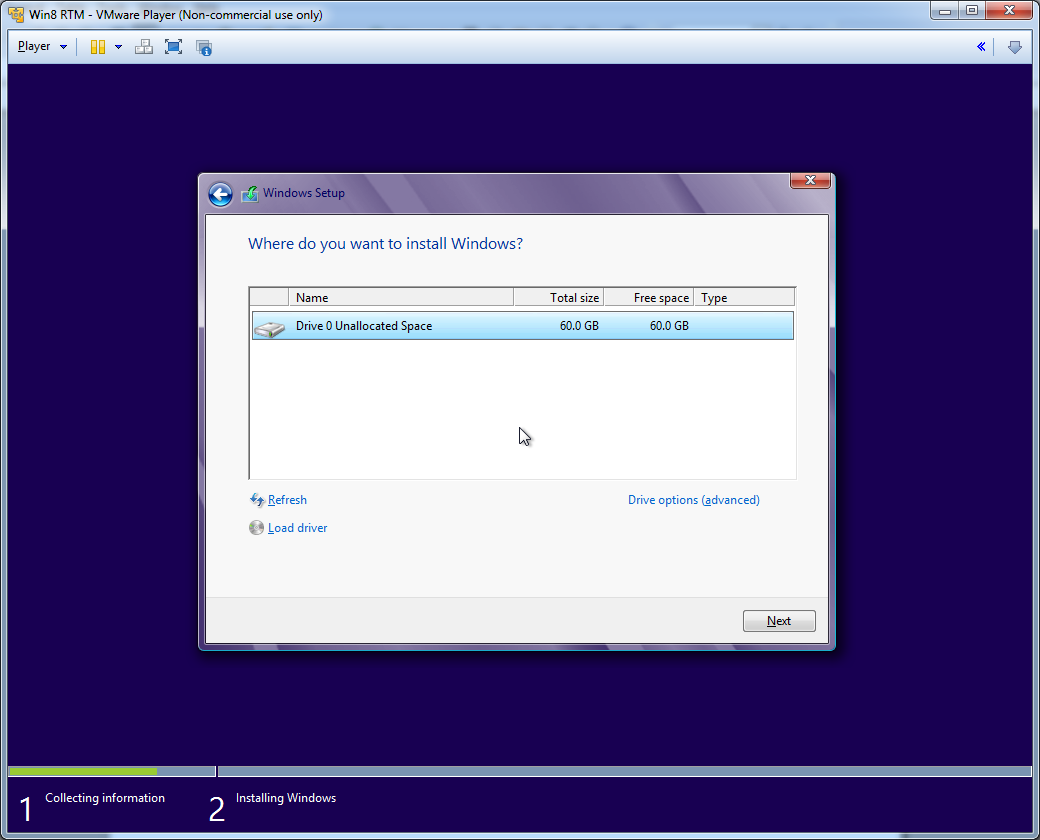
What you should see, is this:

enter image description here

Click Next.

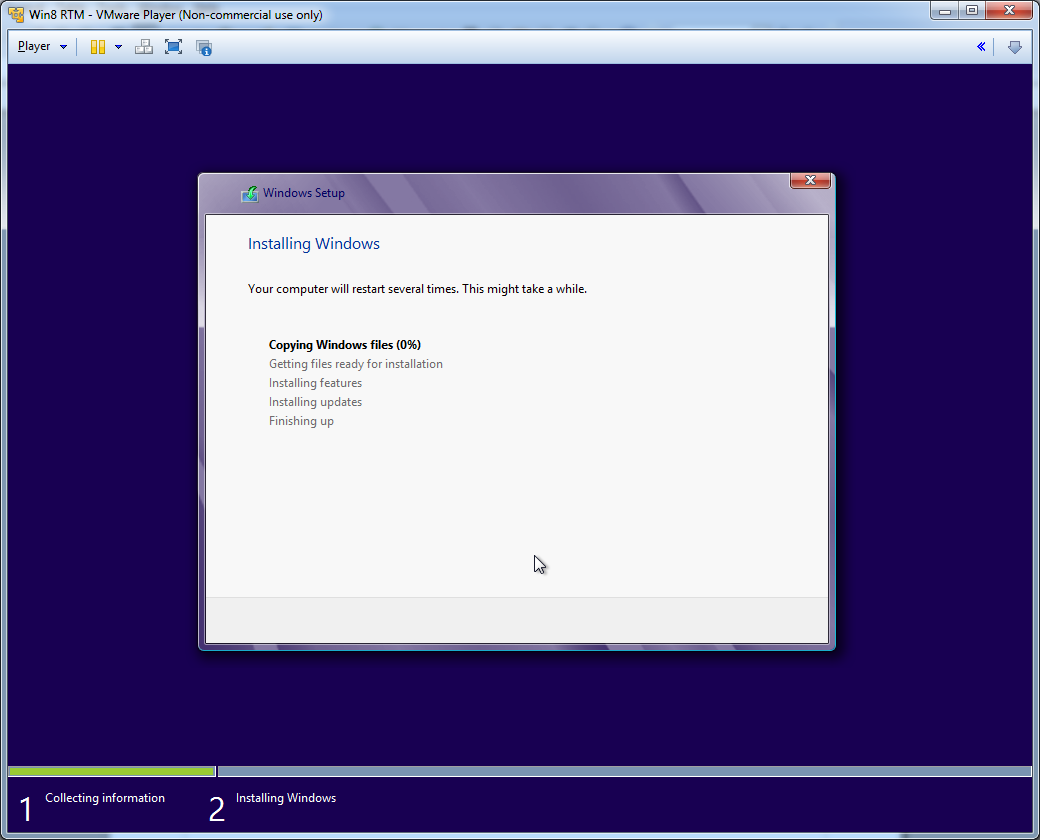
enter image description here

Wait a while. On my machine it took 10 minutes, with a bit of other stuff going on the host machine, mainly typing up much of this.

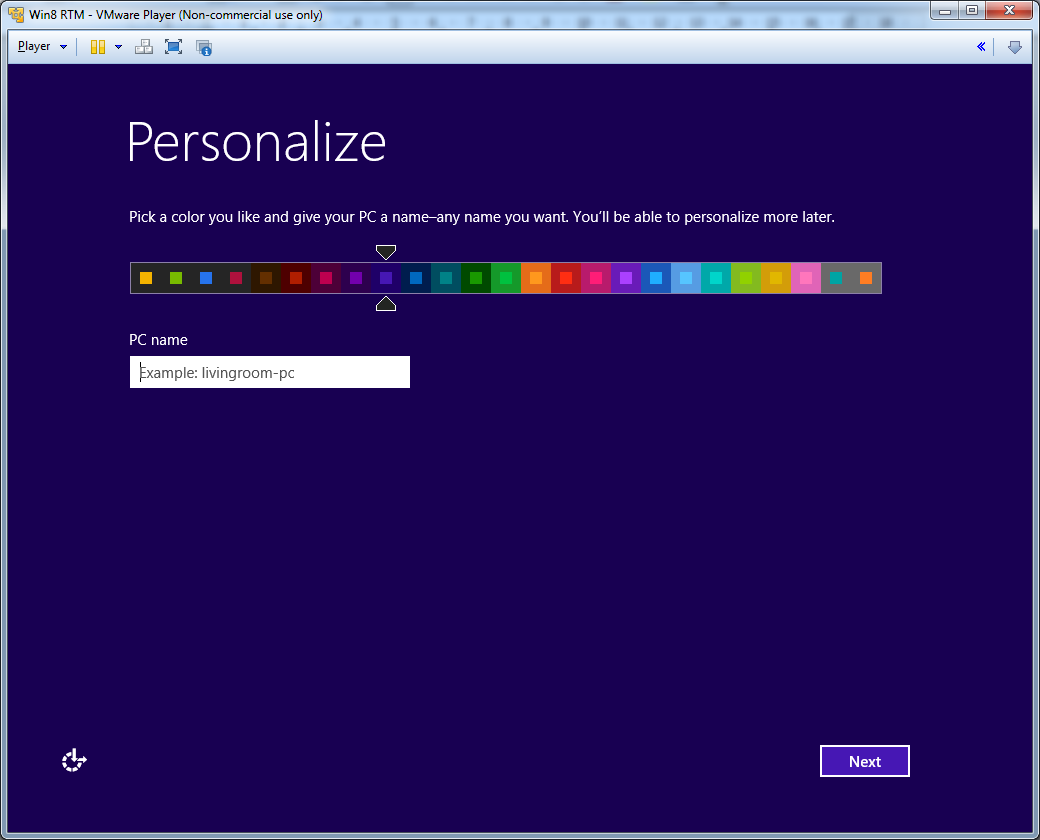
Once setup is done we get to configure the basics, starting with personalization.

enter image description here

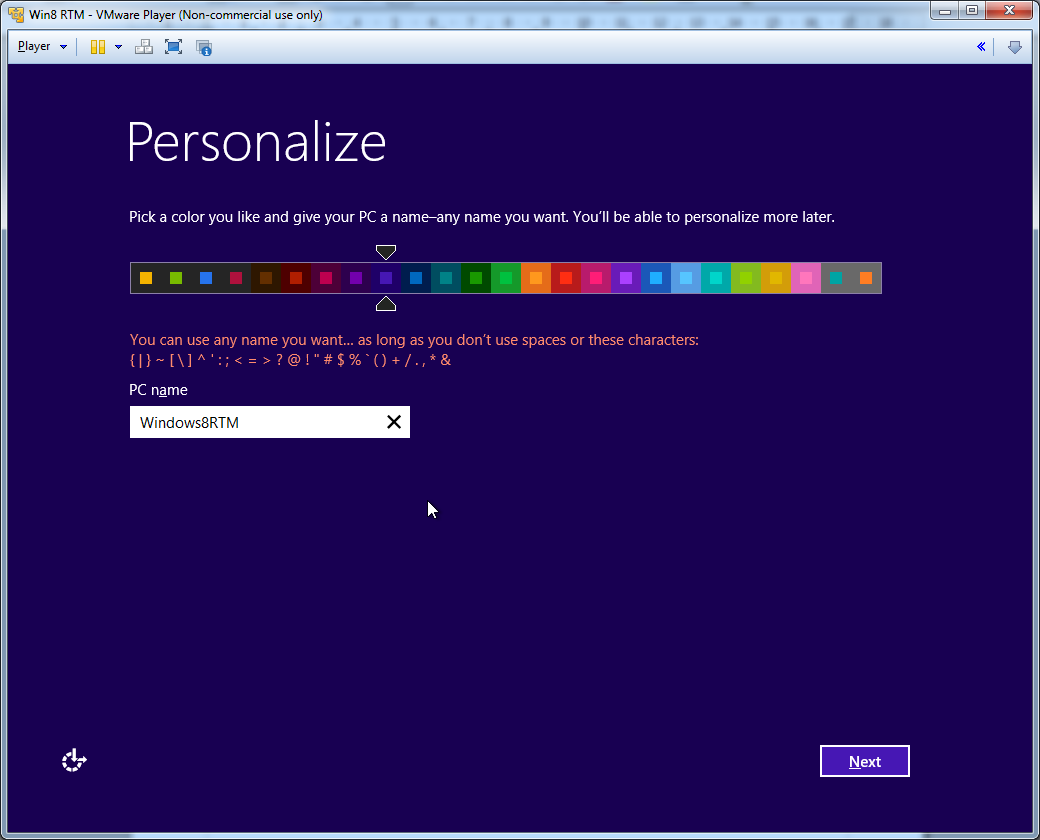
Give your PC a name.

enter image description here

See, I tried to put in a space and saw some Microsoft humor.

Click Next.

enter image description here

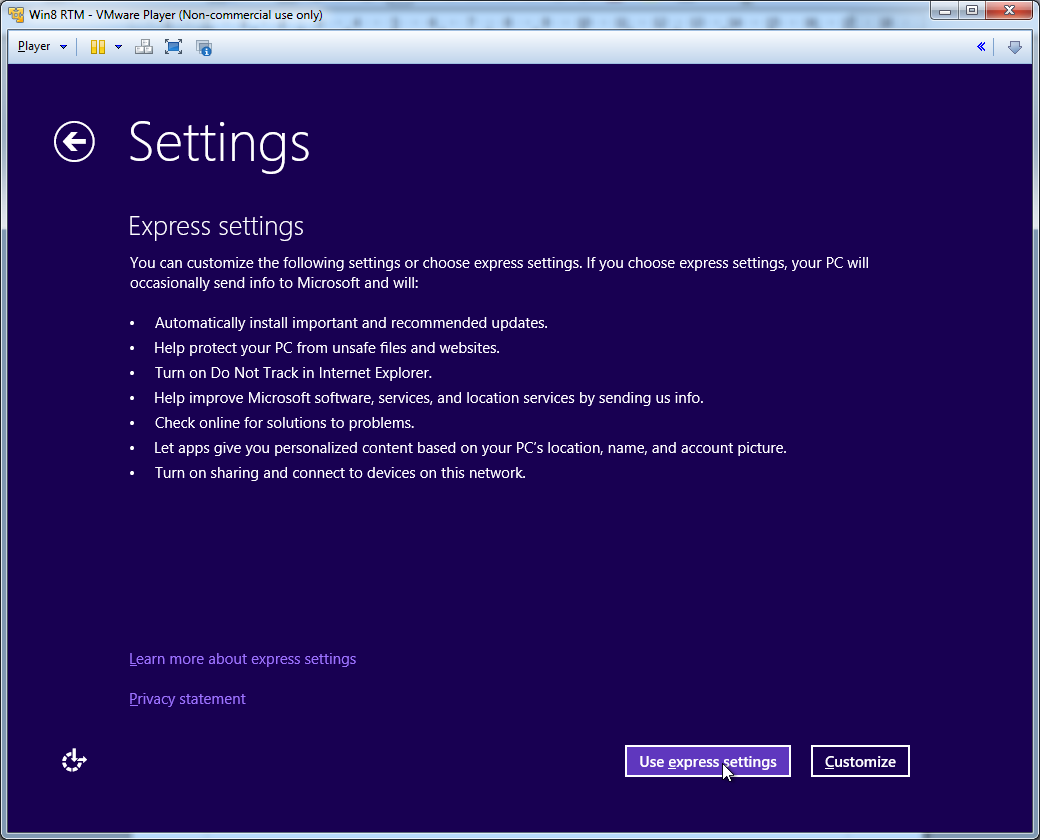
You can customize settings if you want. I just went with express.

Click Use Express Settings.

enter image description here

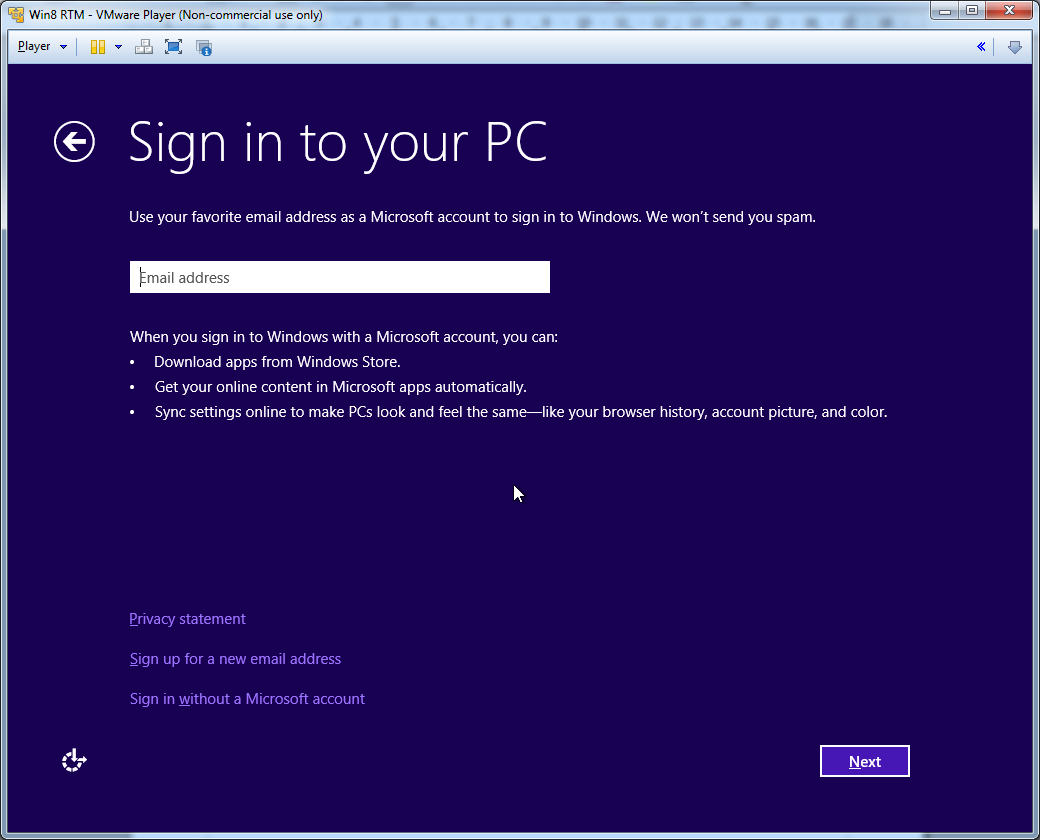
Now we get to sign in, so fill in your details and click Next.

enter image description here

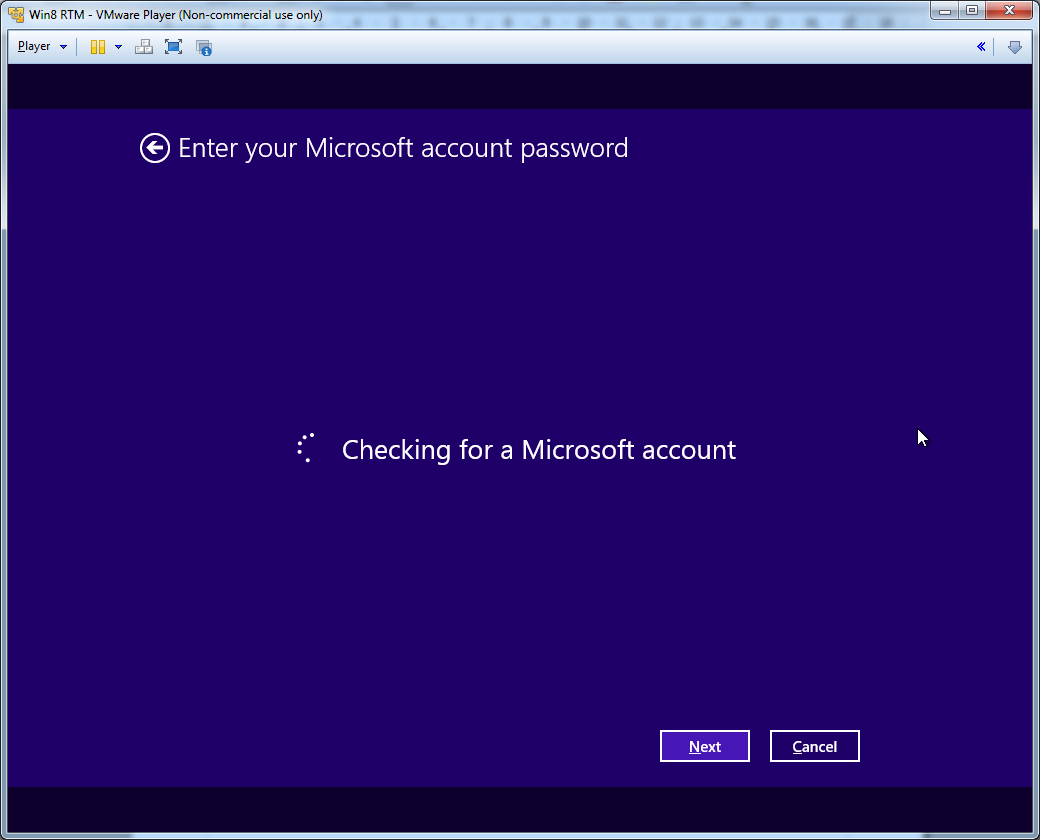
Wait for it....

enter image description here

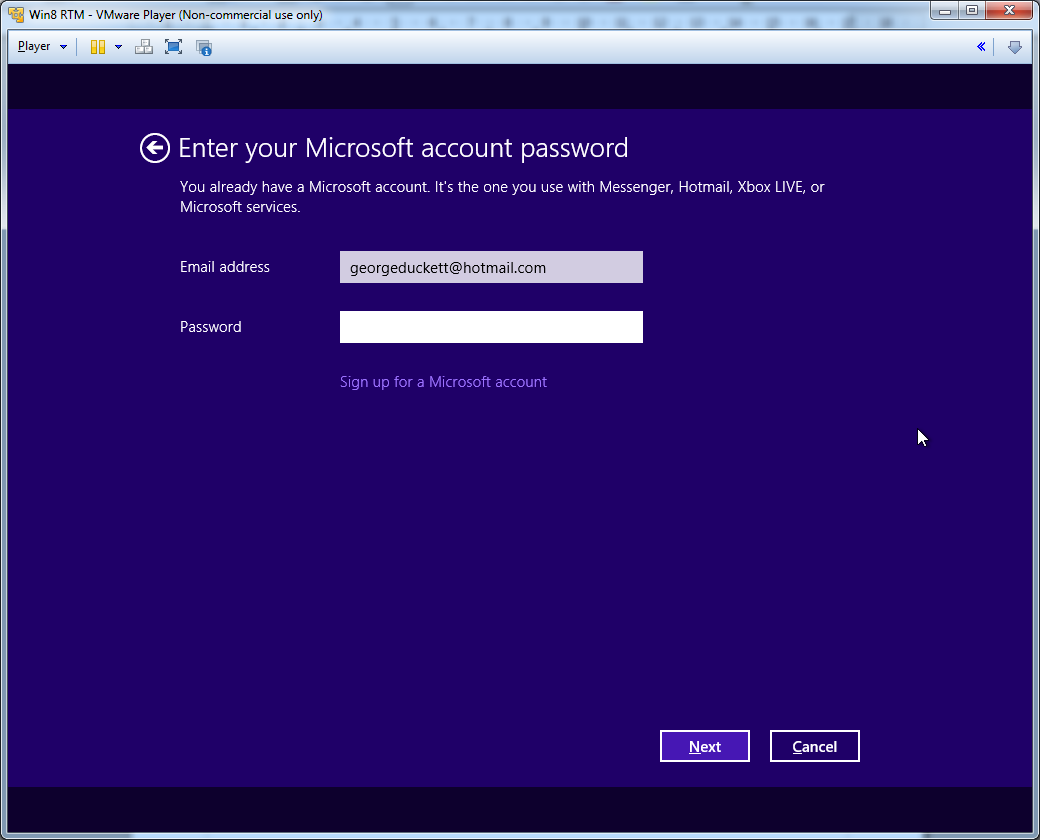
Enter the details, then click Next, then wait a second or to.

enter image description here

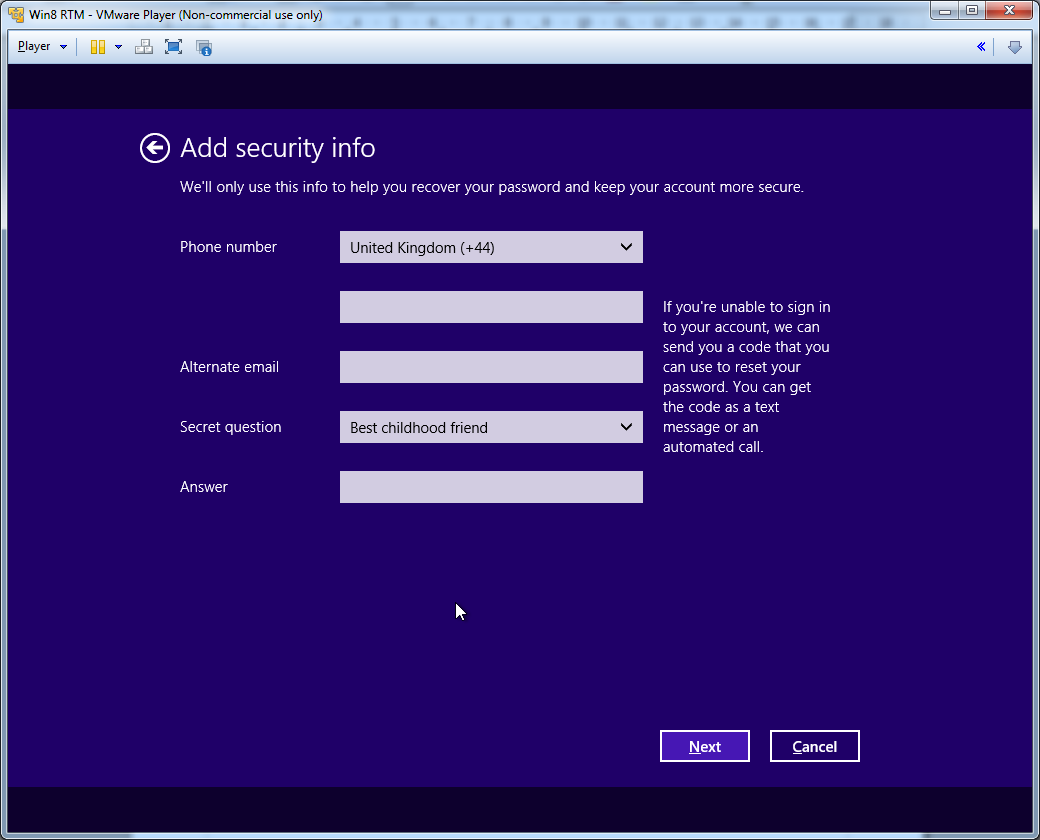
Fill in some security details, then click next. FYI the phone number needs to be correct for the region you specify.

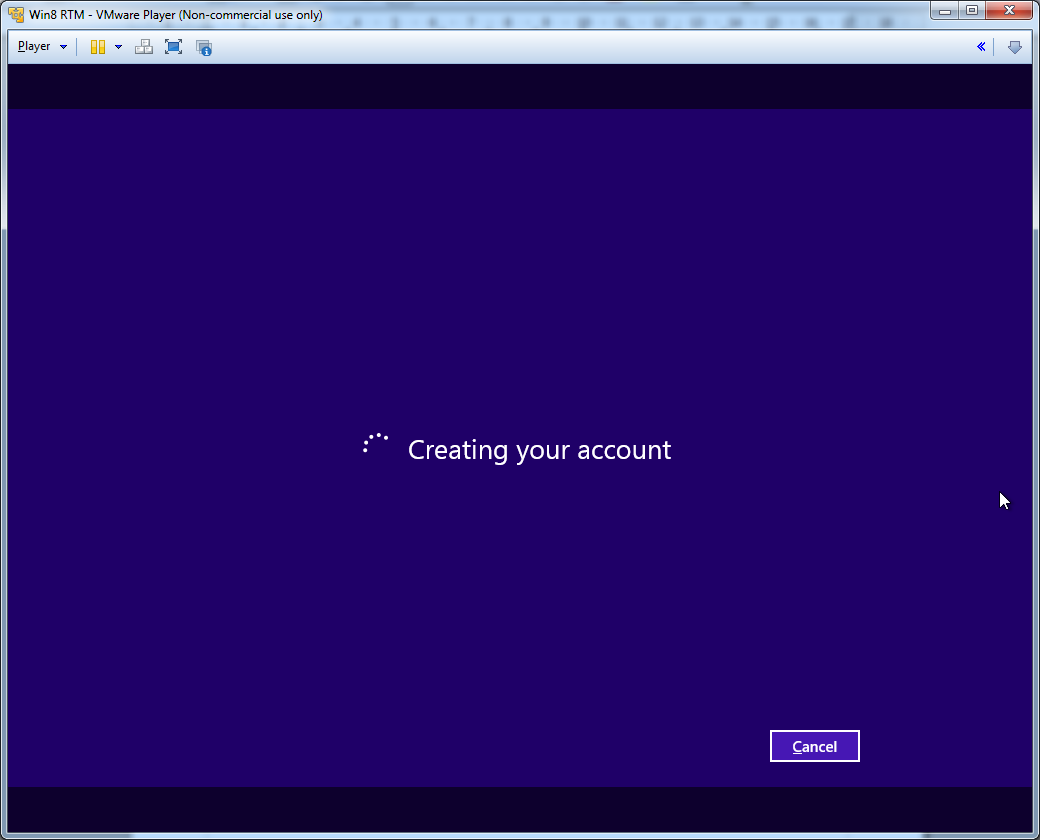
Wait a bit longer...

enter image description here

More waiting...

enter image description here

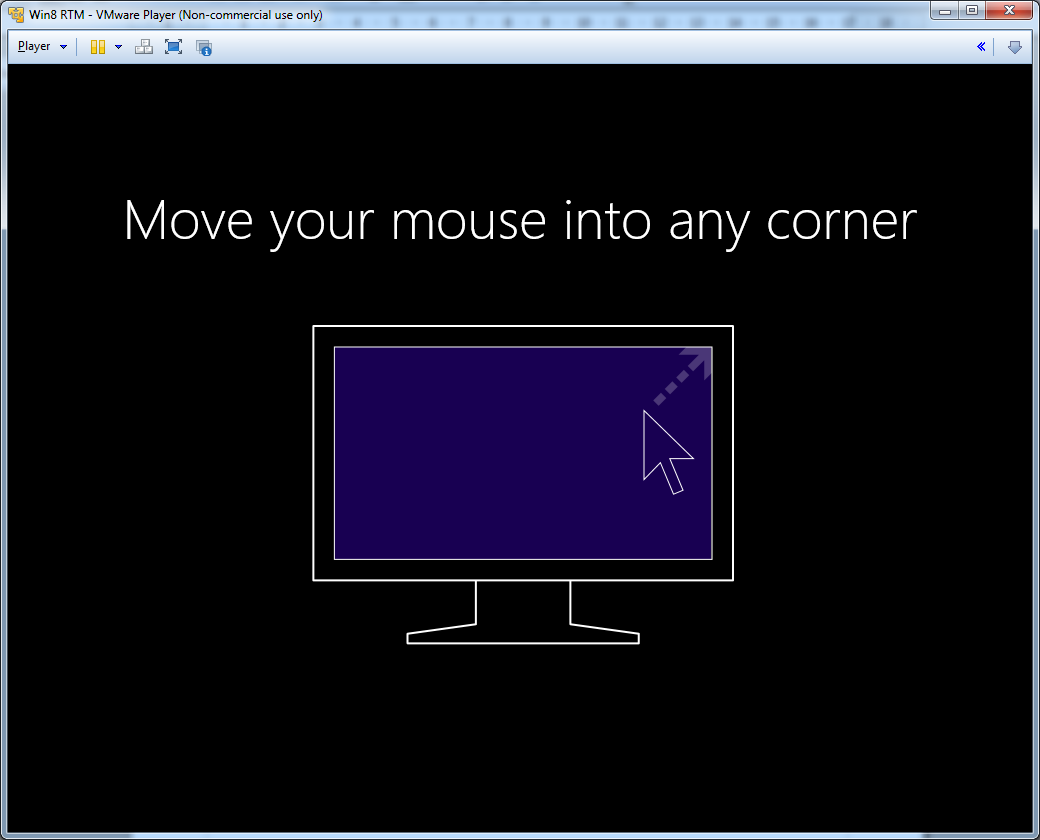
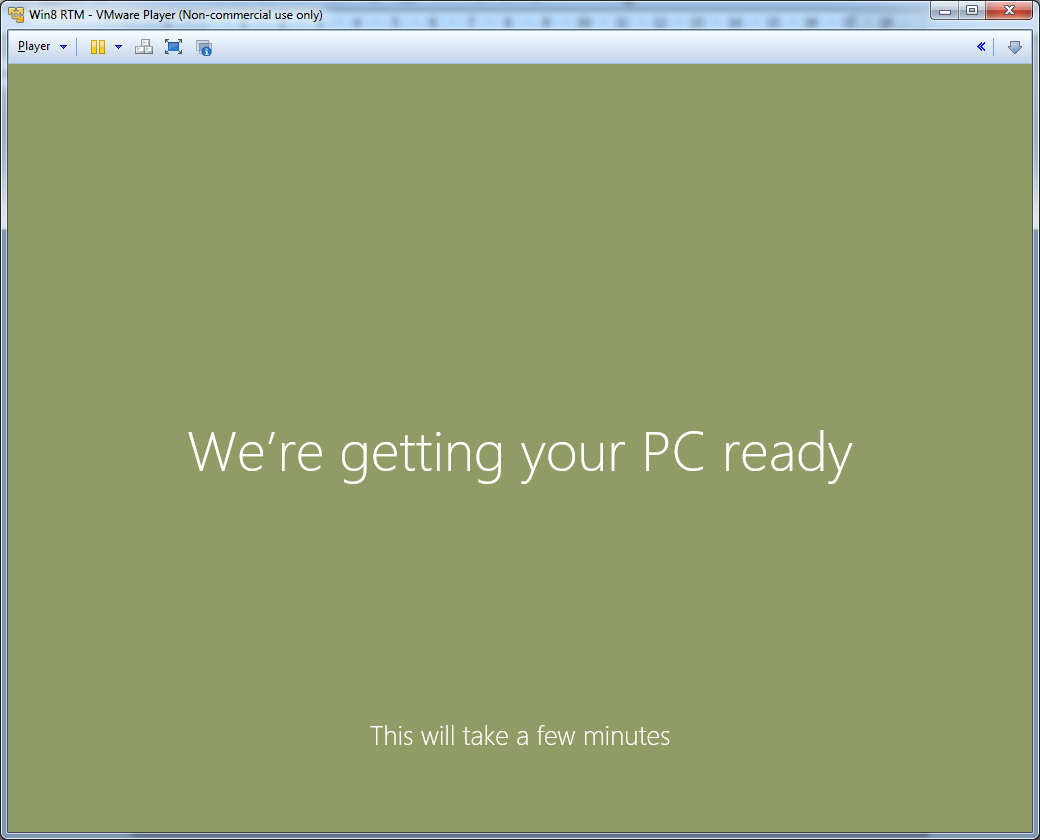
Then you have to wait some more...don't forget to move the mouse within the VM.

enter image description here

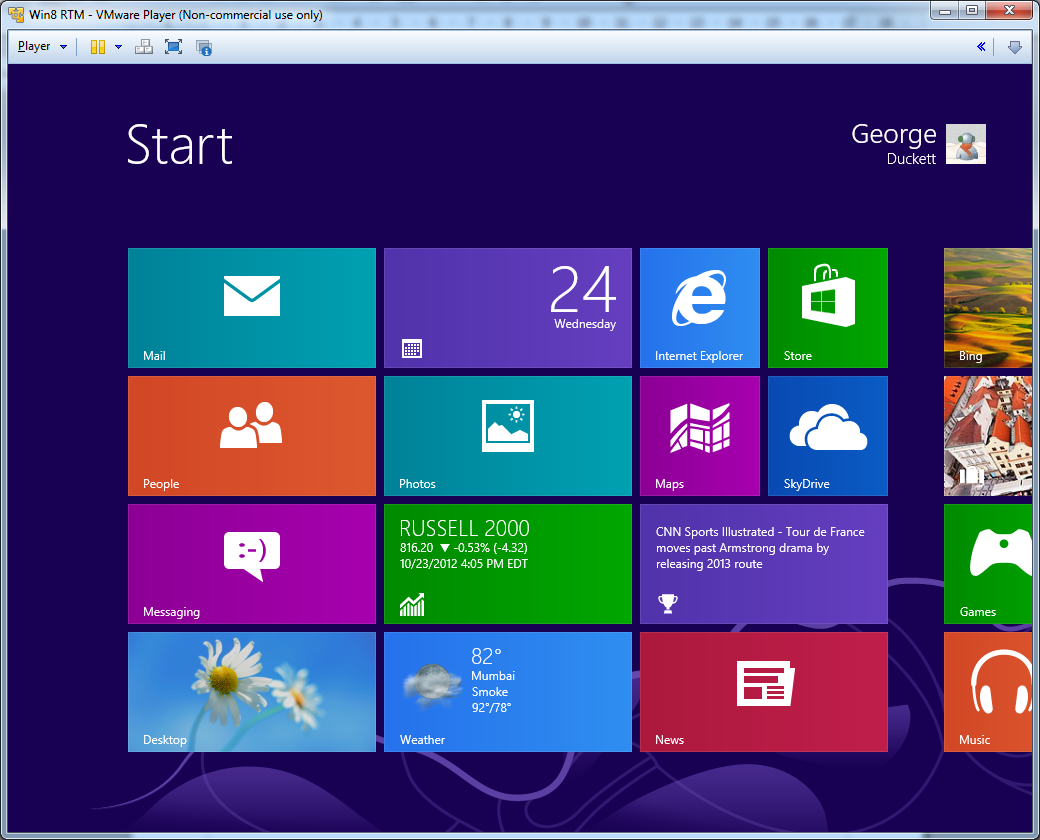
Finally....

enter image description here

What are you waiting for, off you go!

7
  • The KBD markup is intended to generate a visual representation of a KeyBoarD key, not UI elements. And, no, there is no official rule ;) Commented Oct 27, 2012 at 18:00
  • 4
    I know it's main use, I thought I could use it as I have as to me it looks better. Please say of I should change them. Commented Oct 27, 2012 at 18:53
  • 2
    This post is perfectly fine and valid. Though IMO there are too many screenshots. But that's purely my opinion. Commented Oct 28, 2012 at 19:17
  • 3
    I share the same opinion as @Kronos, I almost feel like I'm watching a summary of a video. Commented Oct 28, 2012 at 20:03
  • Ok, thanks for the feedback. Commented Oct 28, 2012 at 20:26
  • Wow. That is a lot of screenshots. FYI I don't think there's CSS for <kbd> on the blog, but I'll check.
    – nhinkle
    Commented Nov 2, 2012 at 7:25
  • @nhinkle: Ok. Looks like it's not going to matter as it doesn't look like this one will get used. :) Commented Nov 2, 2012 at 7:57
5

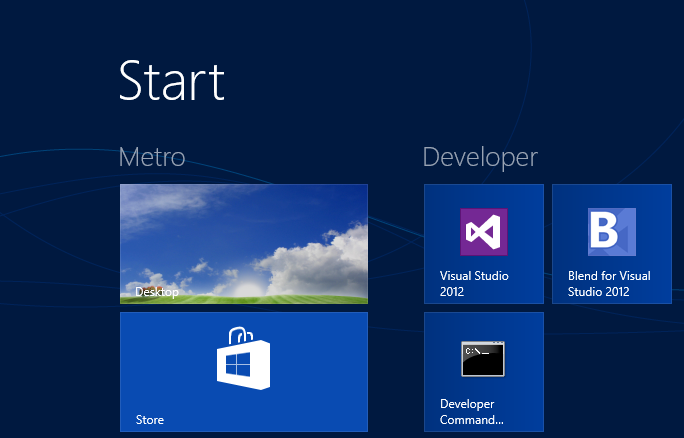
Cool ways to customize the Start Screen

Customize the Windows Store tile

Windows Store

  1. Navigate to C:\Windows\WinStore and make a backup of the images folder.

  2. Take ownership of the images folder.

  3. Open the images folder.

  4. To customize the normal tile, edit the logo.png and logo.scale-x.png files and to customize the wide tile, edit the tilewide.png and tilewide.scale-x.png files.

  5. Open the Start Screen and make the size of the Store tile smaller or larger and you will be able to see the changes.

NOTE: This unique trick was discovered by me and is not posted anywhere.

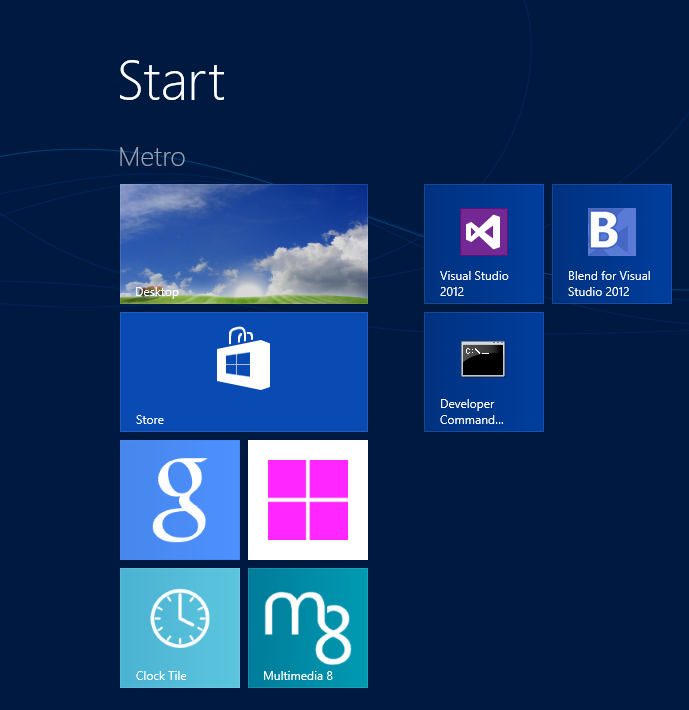
Add heading to tile groups in the Start Screen

  1. Open the Start Screen.

    S1

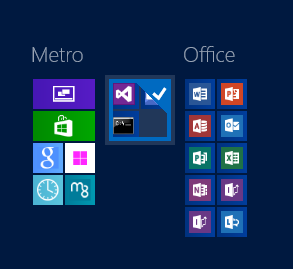
  2. If you are using a tablet, press two fingers on the screen and move them towards each other. Or, if you are using a mouse, click at the extreme bottom-right corner.

    S2

  3. If you are using a tablet, press the group of tiles and move your finger a bit down. Or, if you are using a mouse then right-click the group of tiles.

    S3

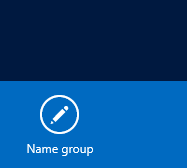
  4. Click Name Group.

    S4

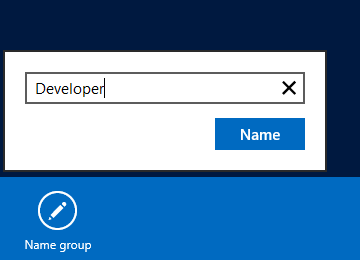
  5. Type the name that you want to give to the tile group and click Name.

    S5

  6. That's it.

    S6

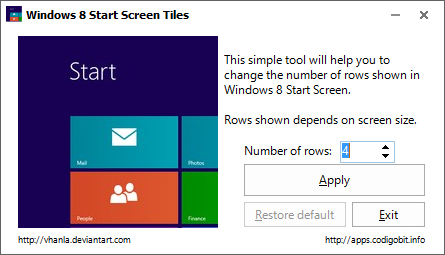
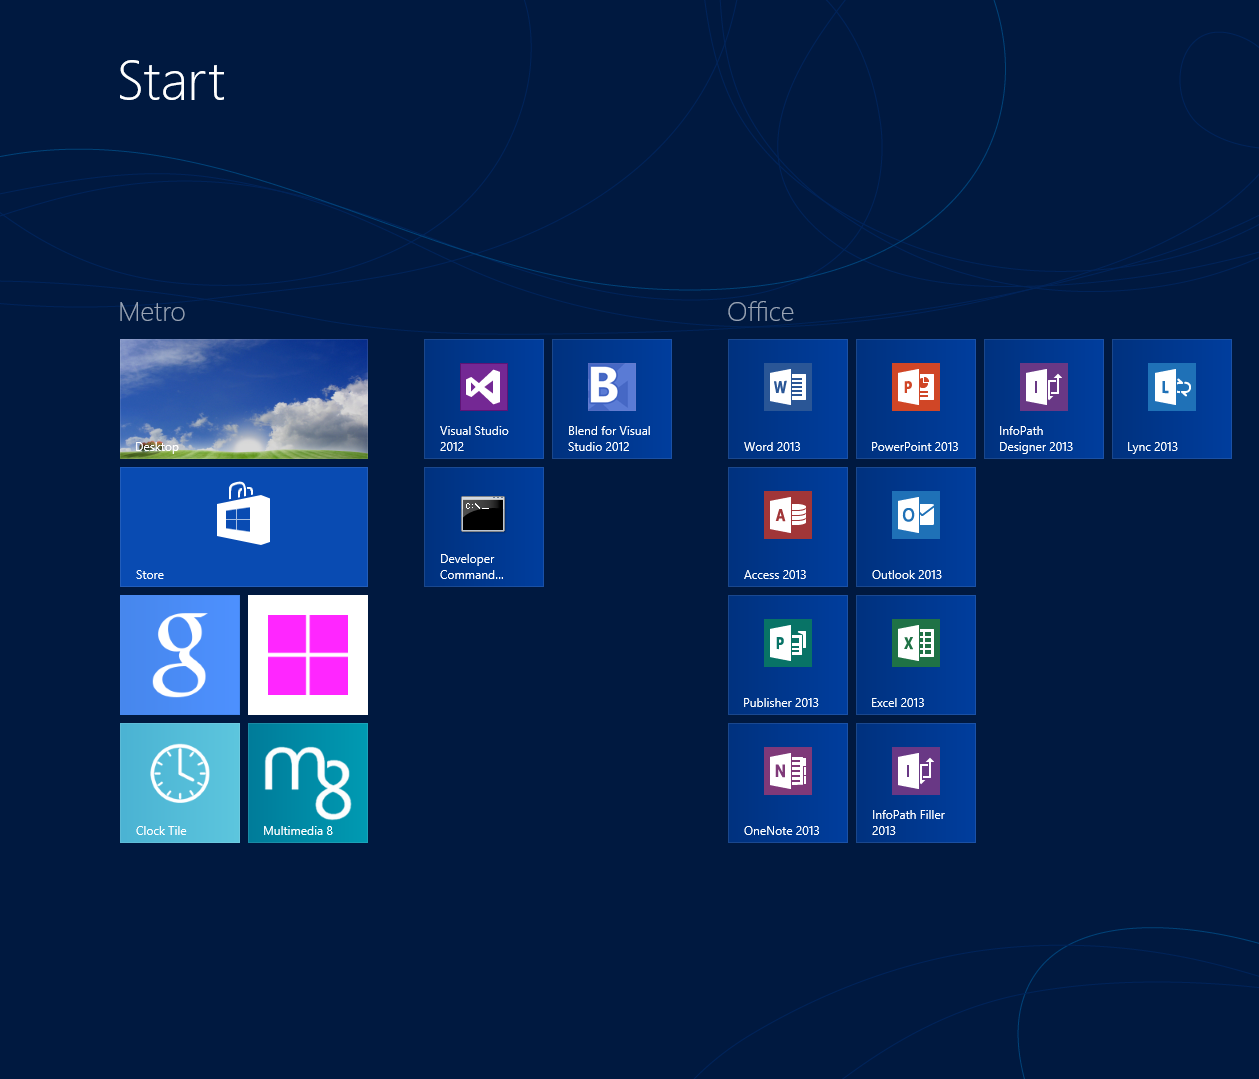
Change the number of tile rows displayed on the Start Screen

  1. Download and run this app.

    S1

  2. Select the number of rows that you want to show and click Apply.

  3. That's it. If you ever want to revert this trick, just click Restore default.

    S2

5
  • 2
    This is a cool trick, but not a really good blog post. Add more details, or change this to a "Cool ways to customize your Start Screen" and then it'd be really good. Commented Oct 28, 2012 at 17:51
  • I agree with @KronoS here, and with a high chance you either took this from an article or my Q&A so you might mention the source. A very good idea is to look for multiple "customization" questions and link to all of them from your blog post, blogging should be more about "talking / explaining" and less about "follow these steps". Commented Oct 28, 2012 at 20:14
  • None of these tips were taken from any article on the net. The first and second tip was my own discovery, third was a tool I found on deviantART.
    – Elmo
    Commented Oct 28, 2012 at 20:19
  • Thanks for the group trick! Is there any way to control which group new icons get added to?
    – mtone
    Commented Oct 30, 2012 at 14:54
  • Afaik, none discovered yet.
    – Elmo
    Commented Oct 30, 2012 at 14:57
2

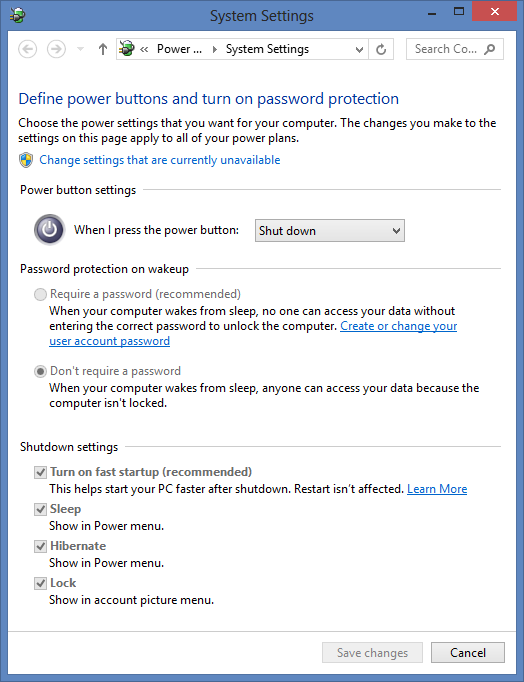
What is fast startup & how to disable it?

Fast startup (also called Hybrid Boot) is a new feature introduced in Windows 8 that allows your PC to boot up to 30%-70% faster. Whenever you shut down your PC, Windows 8 creates a file called hiberfile.sys that contains the Windows 8 kernel. When you start your PC again, it just reads that file from the drive and puts it in the memory. This allows your PC to start much faster than loading all the drivers, services, etc. again. It gets even faster still if you install Windows on a solid state drive instead of a regular hard drive.

Unfortunately, there are some downsides to the feature as well: it can break WOL (Wake on LAN) functionality, and sometimes programs that need to restart your computer won't realize that you've done so. Here's how you can disable the feature if you need to:

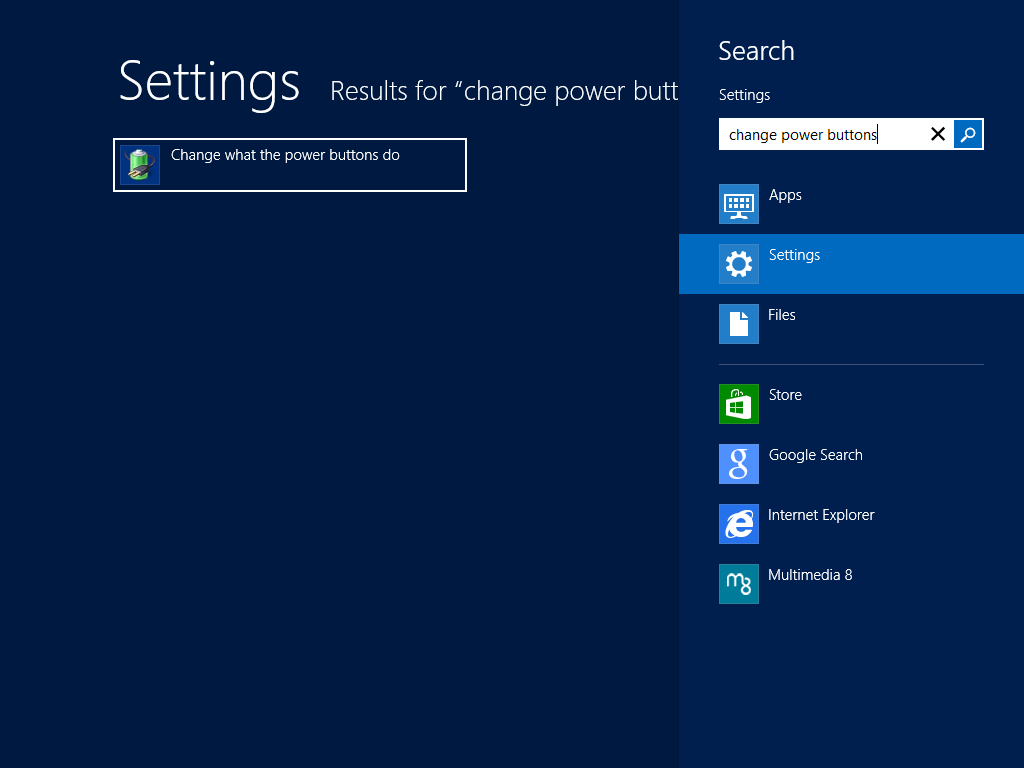
  1. Press the Win + W key.

  2. Type change power buttons and press Enter. S2

  3. Click Change settings that are currently unavailable. S3

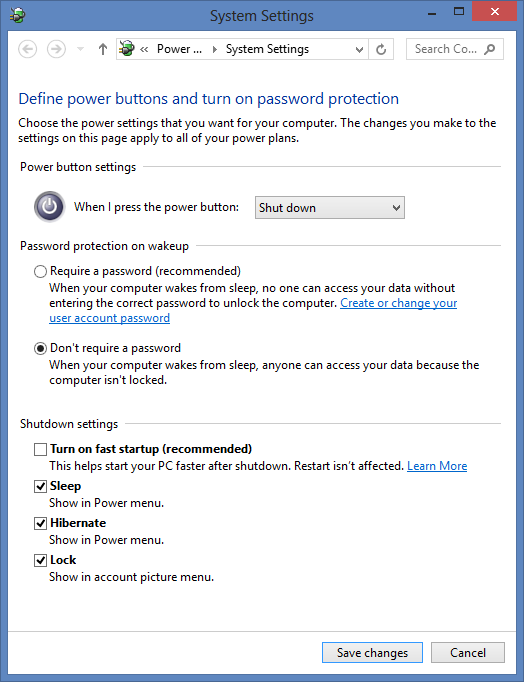
  4. Uncheck Turn on fast startup. S4

  5. That's it. Now fast startup will be disabled and you will be able to use Wake-On-Lan (WOL) too.

4
  • This feels more like a typical Q&A, of course we have QotW on the blog but that's for really famous questions while this one is solely about changing some option which your readers might not know about. Consider starting your blog post where you deliberately explain what fast startup is and how Microsoft has implemented that, the Learn More link in the last screenshot is a nice start to learn about and you can read more in this blog post, especially the Hiberfile and the last image before the video. Commented Oct 28, 2012 at 20:11
  • And hibernation is not new; XP could load “more faster” too (I think even 2000 may have had it).
    – Synetech
    Commented Nov 2, 2012 at 5:38
  • Yup, it was around in 2000 (a bit buggy though). Commented Nov 3, 2012 at 13:27
  • @Synetech Pre-NT, it was available in Windows 98 Second Edition and probably in Windows 95 too.
    – wizzwizz4
    Commented Apr 18, 2018 at 16:32
2

What is File History?

It’s a feature introduced in Windows 8 that offers a new way to protect files for users. File History is a backup application that continuously protects your personal files stored in Libraries, Desktop, Favourites, and Contacts folders. It periodically (by default every hour) scans the file system for changes and copies changed files to another location. Every time any of your personal files has changed, its copy will be stored on a dedicated, external storage device selected by you. Over time, File History builds a complete history of changes made to any personal file under Libraries.

Backup of personal data is a big headache for the users on Windows. There are countless solutions on the market, but Windows 8 has a simple file backup built right into the operating system. Sadly, it isn't on by default, so users need to enable it after they have set up their new computer, or upgraded the existing PC to the new Microsoft operating system. It’s a simple process, but don't expect a big feature set.

enter image description here

How is it different from restore point in Windows?

It is completely different form it, as in system restore process you can just restore the settings and program but not the files in your profile. And you have to create a restore point manually.
While File History has scheduled built in function to run it at specific time to backup your folders and data but it will not store your settings and the programs you have installed on your system.
By default it is turned off you have to turn it on. When you turn it on it need an external storage device as Windows will not perform the backup on the system storage.

How does it work?

Backup:-

By default it is turned off so you have to turn it on. Go to the Control panel>File History or just type at the start screen File History under the settings. Before you start using File History to backup your files, you'll need to set up a drive to save files to. If you don't have connected an external storage device for backup then you will have disabled Turn On button.

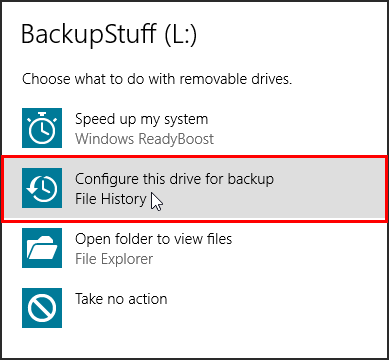
You can also set up a drive in AutoPlay by connecting the drive to your PC, tapping or clicking the notification that appears. From that moment, every hour, File History will check your libraries, desktop, favourites and contacts for any changes. If it finds changed files, it will automatically copy them to the File History drive.

Restore:-

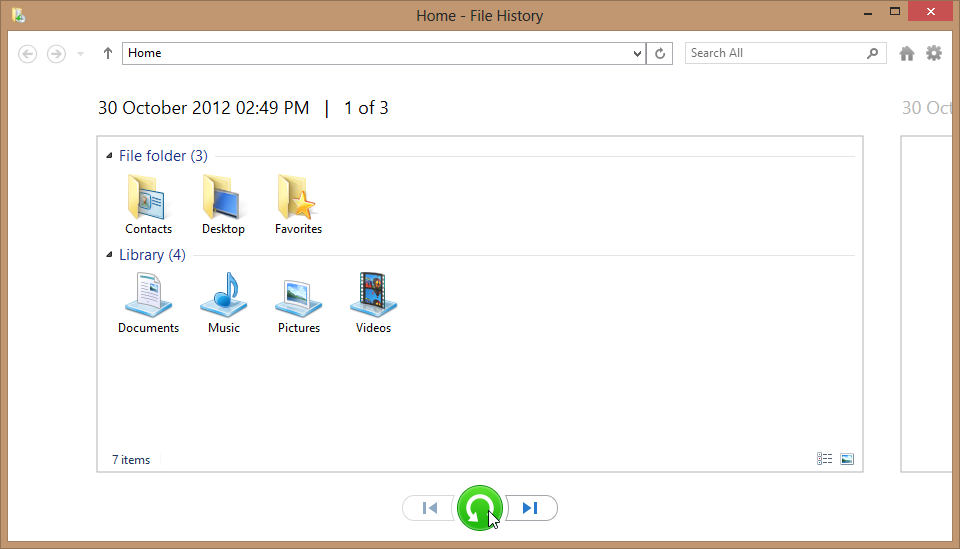
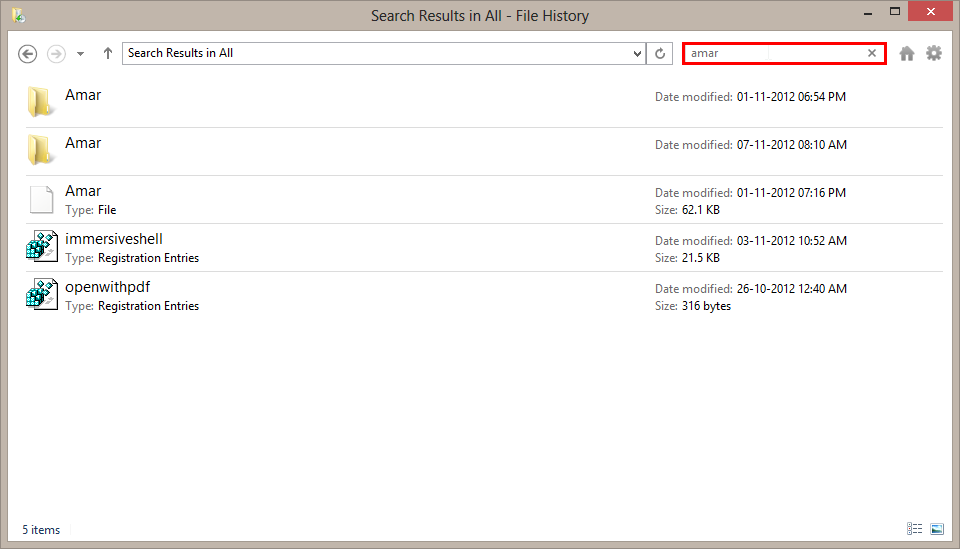
Now when you want to restore your files just click on the Restore personal files option in left panel at Home-File History window. You can see the different files of backup by click on next and previous button.
Select the folder you want to restore and then just click on the green button which will start the process of restoration

enter image description here

or you can do the following thing:

Browse personal libraries, folders and files in a way very similar to Windows Explorer.
Search for specific versions using keywords, file names and date ranges.
Preview versions of a selected file.
Restore a file or a selection of files with one tap or a click of a mouse.

enter image description here

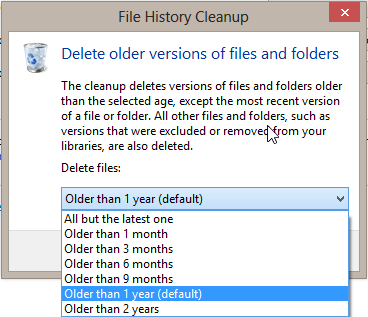
Customize Backup:- If you want to set the time period for when the copy should be auto backup then go to Advanced settings in the left panel at Home-File History window. You can also set for how many days you want to keep the version of the file in the drive, how much offline cache should be used when your backup drive is not available.
Offline cache is actually saving the copies of your backup on your local drive but it will be flushed all when the configured backup drive will be available for backup. You can even clear your all backup or a specific one under Advanced Settings by click on Clean up versions

enter image description here

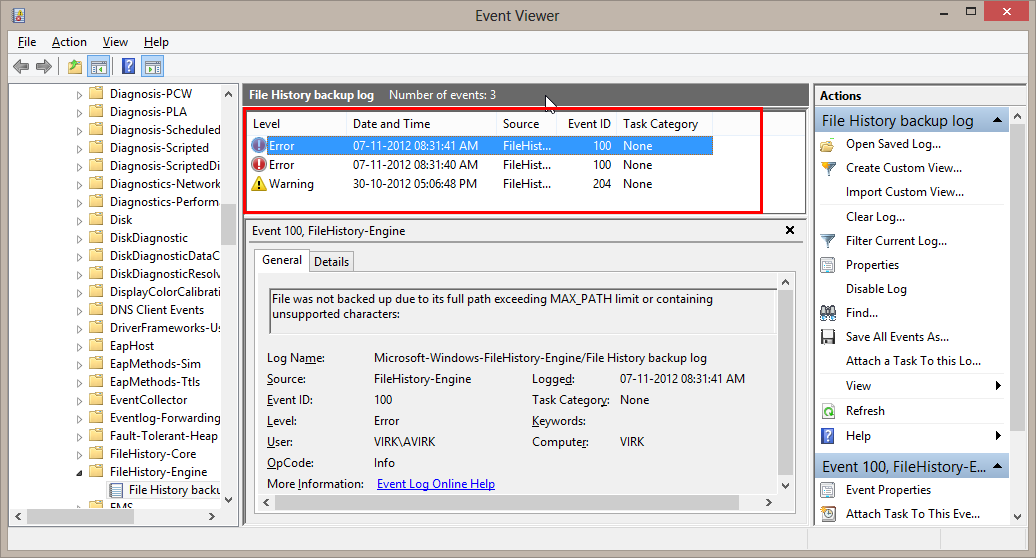
How can I be certain that all of my files have been backed up successfully?

You have to check it manually in event log under "Advanced Settings". There you can see the warnings and error if any occurs.

image

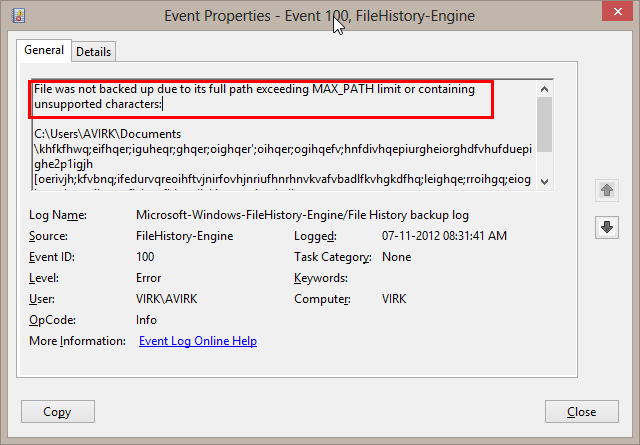
Is there any way to be warned when a backup is unsuccessful?

At the moment there is no automatic error report of back up failure (for example, if one of your folders is not backed up). You have to do it through event log.

image

Is File History providing a full backup?

File History is not providing a full backup process say like entire system back up with apps. But there is a solution for it by Microsoft, for that follows few steps:

Create a recovery drive to be used when you need to refresh or restore your PC.
Connect to your Microsoft account
Configure your PC to sync your
settings Load apps from the Store
Turn on File History

When your PC is replaced or needs to be reinstalled:

Use the recovery drive to restore the operating system
Connect to your Microsoft account
Configure your PC to sync your settings – this will bring your settings back
Go to the Store and reinstall your modern apps Reinstall legacy apps Connect your old File History drive and restore everything, this will restore your personal files

It may require more steps than a file or image restore but has some clear benefits:

You do not restore any “no more desired” software or settings that were on your system
You do not restore sources of some problems that you might have (or create new problems if you restore to different hardware)
You do not restore settings that may cause your system to perform badly or fail

Those who need a full system backup can still use Windows Backup to create a system image.


Some FAQ from MSDN Blog

What happens when you upgrade to Windows 8 from Windows 7?
If Windows 7 Backup was active, i.e. it was scheduled and the schedule was active, then it will continue running as scheduled after the upgrade. File History will be disabled by default and users will not be able to turn it on as long as the Windows 7 Backup schedule is active. To turn it you will have to first disable the Windows 7 Backup schedule.

Can Windows 7 users use File History?
Windows 7 users cannot use File History. However, they can restore files from a drive used by File History by browsing the volume in the Windows Explorer and selecting a specific file. Files on the File History drive are stored in the same relative location, and use the same name. The specific version can be identified by the time stamp appended to the file name.

Does File History protect the operating system and applications?
File History only protects user libraries, desktop, favourites and contacts. Other files, such as operating system files, applications, and settings, are not backed up.

Can File History be used with cloud storage?
No. File History is designed specifically for consumers and does not support cloud storage in this release. Windows 8 Server offers a backup feature that can back up files to a cloud. This feature is available on the Server version of Windows and is designed for small and medium businesses.

Can File History be used by enterprise customers?
Yes. However, enterprise customers should be aware that File History may not comply with their company security, access, and retention policies. For that reason, we offer a group policy setting that allows enterprise administrators to disable the feature for an entire organization.

Will File History protect files stored on a file share?
No. File History only protects file stored on a local drive.

2

Is Windows 8 more than just shiny?

We all know by now that Windows 8 comes with a new Modern UI which gives you a very good live overview of your new Modern UI applications and feels very welcoming; as well as a new lock screen, login screen and a somewhat incompletely revised Control Panel. As well as Windows Explorer getting a Ribbon overhaul, an improved task manager and an even more sad BSOD. But most of those are just to make it more shiny (although they are underlying reasons as well, because they haven't developed WinRT to be shiny), let's take a look at what else did they did to improve Windows 8.

Windows 8 Start Screen

Getting into your session faster and more secure

The Basic Input/Output System (BIOS) has been there for years and its time for it to move on; to help with that Windows 8 leverages the use of Unified Extensible Firmware Interface (UEFI), which has been redesigned form the ground up to get rid of all the dust (workarounds, bugs, inefficiency) that came along with BIOS which makes it a lot faster as it does just what it needs to do, boot fast. Besides allowing you to boot faster it also allows you to boot more secure, using the Secure Boot feature which can lock out both people and rootkits from tampering with the boot. Although you might want to think twice before enabling it as you don't want to lock yourself out...

Optimizing one part of the boot is not efficient, this is why people working on optimizing the boot of a system look at the different parts of it. The longest part of the boot has been system initialization for quite a while, this is why they have decided to deliver faster boot times by hibernating the kernel.

As you can see, this introduces a huge difference in boot time, almost the half of it in total. Hibernating the kernel shouldn't be confused with hibernating the whole computer, they attempt to just hibernate what's necessary for a boot such that they don't have to load in everything again but can instead load in a hibernated state of what's necessary to run your session. This is done using a Hiberfile after which they only have to reinitialize the drivers before going into your user session.

Getting even more secure

Efforts have been made to make Windows 8 more secure against viruses, rootkits and more; a result of this is that a lot of viruses that targetted earlier versions of Windows have a high chance of not working on Windows 8 (and especially not on 64 bit editions). Besides that, they have introduced different ways to login (PIN / Picture), antivirus capabilities to Windows Defender and SmartScreen filtering integrated into the desktop; as well as the Secure Boot I mentioned and Family Safety.

Might something tamper with your computer then you can use the new "Refresh" or "Reset" functionality that Windows 8 brings, for people whose System Restore isn't usable:

  • Refresh: Refreshes the OS but leaves all your files and settings untouched. Modern UI Apps downloaded from the Windows Store will be kept but other applications will be lost.

  • Reset: Everything is removed and the system is put back to a fresh install.

Let's just hope we don't have to use these any time soon...

Integration with online services

Logging into Windows becomes as simple as using your Microsoft account (formerly known as the Windows Live ID), such that you can use the same login on multiple devices and sync settings and synchronize applications between them; as well as access Skydrive, Xbox services and even third-party services like Flickr, Twitter and Facebook.

The Windows Store also makes it easier to obtain applications such that you don't have to search the web but can just browse a store which only shows applications without the unnecessary irrelevant information around it. While it's very early, there might not be enough applications yet to cover a lot of fields; but with time, this surely becomes handy.

Following the new standards

Not only UEFI has been followed, Windows 8 brings support for two standards who are getting very popular, namely USB 3.0 and Near-Field Communication (NFC). There aren't much more standards they need to additionally support I think, but if they must they probably would do it in a Service Pack anyway...

Taking your work space with you

Now, when you're at your workplace you have Windows 8 Enterprise on either a computer or a laptop. But carrying that computer or laptop around might be a bit too much sometimes; what if you could just take along an USB key if you need to do something on the field, whether it's troubleshooting an user, maintaining a server network or allowing your students to have a university session they can take home. That's possible with Windows To Go which allows you to take your user session wherever you want, as long as you use a compatible USB stick.

So, yes, Windows 8 is more than just shiny!

1

Windows 8 Default Browser: To Metro or not to Metro, that is the question

How to set the Google Chrome tile on your start menu to launch the desktop version instead of the metro version

If you install Chrome and set it as the default browser for Windows 8, an unfortunate side-effect occurs: when you launch Chrome from the Start screen, the Metro version of the app starts.

Why is this annoying? There are several reasons I can think of, and you may find others as well.

  1. The Metro version and the Desktop version store user data separately, which means any links, passwords, history, or anything else you want access to will only be available in the version you set it up in.
  2. The Metro version doesn't allow any other apps to "intrude" on the experience, which means you can't refer to another app while using the browser. For example, you can't open KeePass when logging in to a site to paste your username and password. You also can't minimize your browser to key in data from another app without having to switch between the two. (For example, Excel or the Calculator)

Fortunately there is a fairly easy way to fix the situation, causing the Chrome Start Tile to launch the Chrome Desktop version.

CAUTION: The fix involves editing the Registry. If you feel comfortable doing this, carry on -- the edits are simple. However, if you aren't sure what you are doing, making mistakes while editing the registry can cause real problems for your system.

  1. Hit the Windows key to open the Start screen
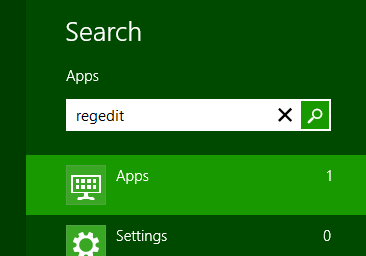
  2. Type "regedit"

Finding regedit

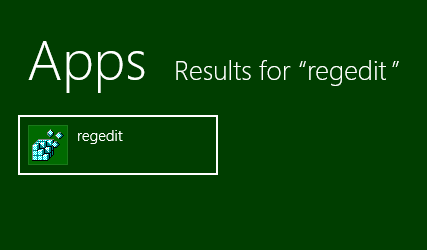
3. Click regedit in the Apps search results to launch it.

Launch regedit

4. Expand HKEY_CLASSES_ROOT

Expand HKEY_CLASSES_ROOT

5. Type chr to select the Chrome registry key without having to scroll to find it

Find the Chrome registry key without scrolling

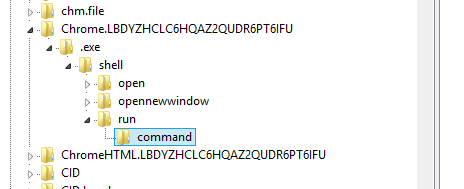
6. Expand the Chrome key down to the command key

Expand the Chrome registry key

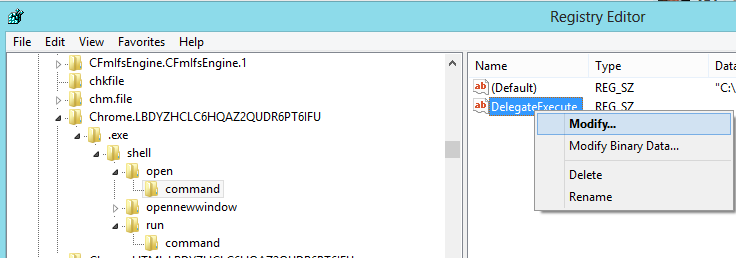
7. Right-click DelegateExecute in the right pane and click Modify

edit DelegateExecute

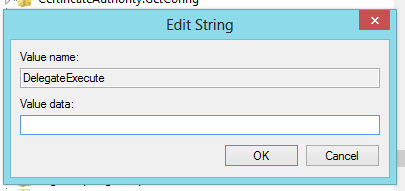
8. Hit the backspace key to delete the Value data and click OK

delete the registry value

9. Close regedit. Your Chrome tile will now launch the Desktop version.

Sources: I found several sources for this information, albeit without the detailed steps and screen shots:

1

TOUCHSCREENS AND WINDOWS 8

Using windows 8 touch features without having a touch screen

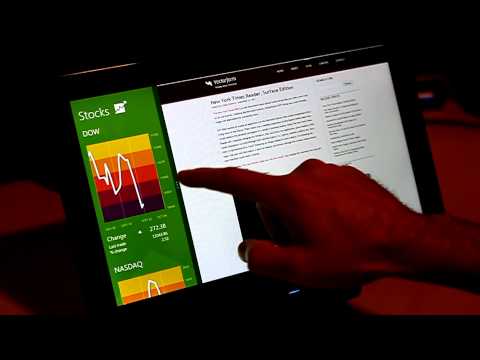
Windows 8 touch features have it's definite charm as windows 8 has made it possible to control not only your tablet but also you personal computers using touch input. Windows 8 Operating system is the perfect intersection of PC and tablet interface, but most of the consumers have no idea about how should they go about using touch on their personal computers and what options they have. This blog post will explore the options available to use windows 8 touch feature without having a windows 8 PC/Tablet .

I. Turn your current LCD display into a windows 8 compatible touch screen display :

Touch screen overlay's :

1) cyclo-touch :

Buy : They have wide variety of touch screen overlay's ranging from 7" to 65" . They are pretty cheap relatively to a touch screen monitor , for instance the 32" touch screen overlay kit costs around 800$ .

How to Install cyclo-touch on a your existing monitor: Follow the steps in this video.

2) Zero-touch : I am not sure if it is marketed online but you should contact Interface Ecology Lab to get more information.

Driver: use ECOTUIOdriver on your windows 8 machine to generate native windows 8 touch events and gestures along with any of the above mentioned touchscreen overlay.

II. Use your android device to control windows 8 touch features :

Step 1: Connect your android device to your windows 8 wireless network .

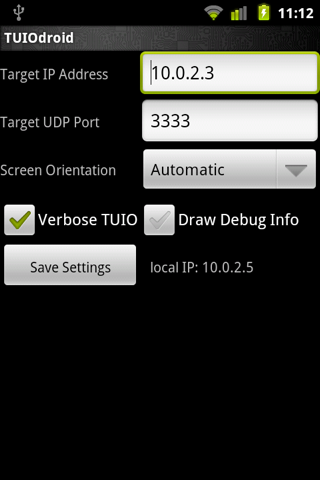
Setp 2: Install tuiodroid :

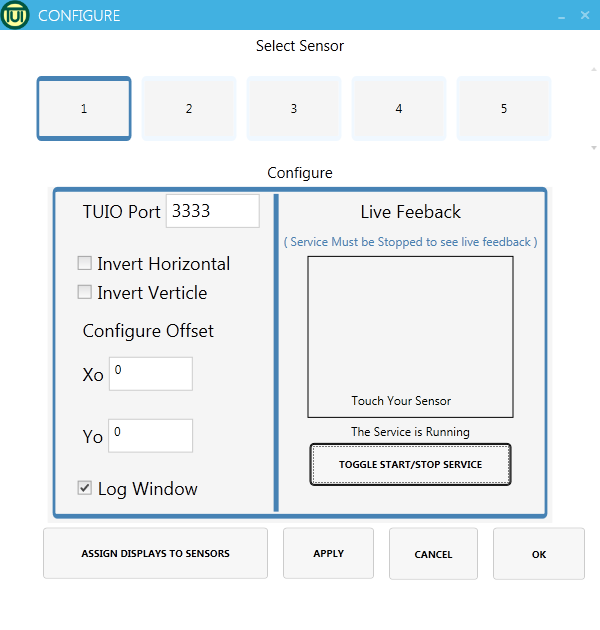
tuiodroid interface

insert the ip address of your windows 8 machine and leave the port to be 3333 .

Step 3: Install ECOTUIOdriver on windows 8 which will generates the native windows 8 touch events based on the input from tuiodroid .

ECOTUIOdriver interface

Step 3: Enter 3333 in the TUIOport text box and hit apply.

step 4: Touch your android phone to control your windows 8 pc.

III. Use Kinect to generate native windows 8 touch events :

KinectTouch turns any surface into a giant touch screen using kinect it generates TUIO events and you can install ECOTUIOdriver to convert these tuioevents to windows 8 events. Using this you can covert any surface into a touch screen . Here is a video showing kinectouch in action .

1

Experiences upgrading Windows 7 to 8 on an HP Pavilion dv6 laptop

Having had a laptop preinstalled with Windows 7 for 2 years now, I decided to try to upgrade to Windows 8, especially since my university allows me to download Windows 8 free off DreamSpark. There are some obstacles to overcome, but the most difficult part was because I was on an HP laptop, where the Radeon Mobility drivers are supported (poorly) by HP.

Even though it has not been smooth sailing, it appears that the actual upgrade can be executed by the average user. Obstacles specific to more difficult computer systems/networks can be surmounted.

Naturally, though there is an in-place upgrade path which can keep existing applications, I was worried - what if an important application is incompatible? Like many other people, I have no backup of my computer, and it is an important tool for my studies. So I asked Super User, how I can back up Windows 7, so that I could easily restore it if the upgrade proves unusable.

It is important to point out that using Windows Backup may not have been appropriate, since it depends on Windows 7 to restore the backup. Naturally, the ideal solution is to create an image of the existing system. Suggestions included 3rd party utilities such as Disk2vhd, Clonezilla and Macrium Reflect Free, as well as the built-in option to create a system image. In the end, I decided to go with the built-in option because:

  • it was easier to see how to restore the image, rather than just browsing the contents (I needed to make sure I could return to a working state for my studies)
  • even though a 3rd party application might have better compression (free), I noticed that, for example you must pay to be able to use the Recovery from Windows boot menu option for Macrium Reflect.

Creating a system image backup

Backing up the computer was easy, though it took 10 hours! To do this, we just select Back up your computer from the control panel, then Create a system image
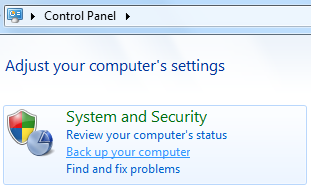
enter image description here enter image description here

Then select the disk in which to save the image. I was able to find the 1/2 TB needed on my trusty 2TB drive. As you can see, the system image includes your main drive, the recovery drive, as well as the system partition. enter image description here

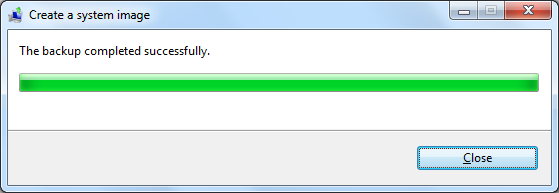
10 hours later...

enter image description here

I also opted to create a system repair disc, since I have never done this, just in case.
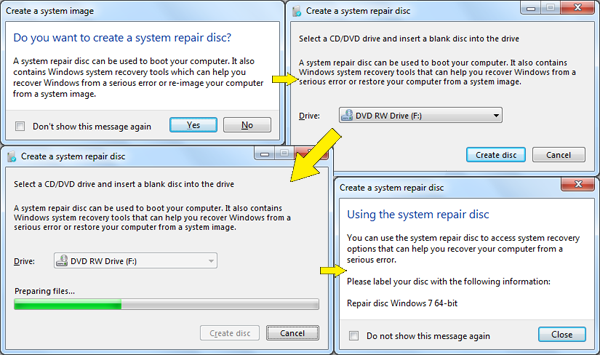
enter image description here


Recover from a system image

To test that my system image was working, went through the initial stages of the restore process. This is accessed from Recover system settings or your computer, in the backup control panel, then Advanced recovery methods. Skipping another backup prompt, the computer restarts in preparation for the restore.
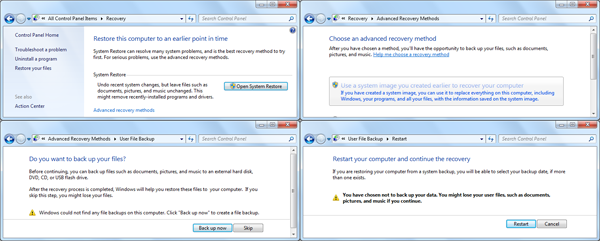
enter image description here

After booting into System Recovery, you can then select the disk where the system image is located. I could clearly see that the image appeared to be working. So I cancelled the recovery, since I only wanted to briefly check that it was there.
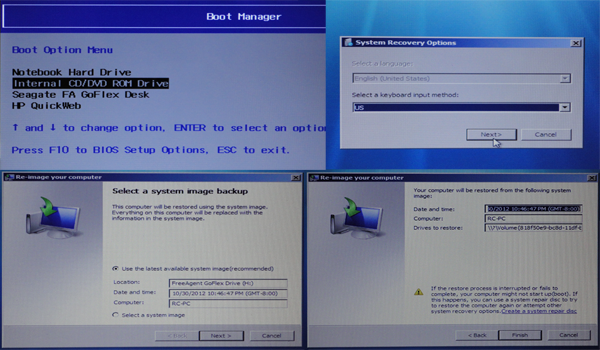
enter image description here


Upgrading to Windows 8

The actual upgrade was not too difficult, but took a while. Updating was quick and simple. After that, the product key is also easy to enter, accepting the agreement. Then I choose to keep everything - user files, settings and applications. This means that I can be up and running with Windows 8 much faster, without having the re-install the many applications I use.
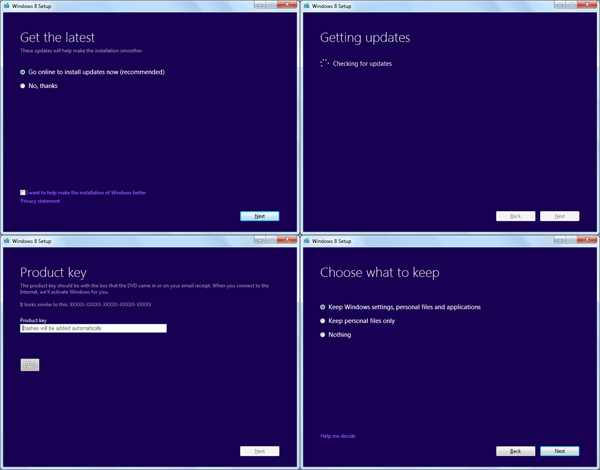
enter image description here

Unfortunately, that choice led to me being stuck on this screen, and wondering what was wrong. The minutes ticked by, and I began to think it had stopped working. It didn't help that the process didn't take much CPU (according to the task manager). After checking on the internet, and finding somebody was stuck on this screen for 2 hours, I settled down to wait for the long haul. Microsoft, this is just not acceptable. Whenever something is going to take a while, it is only courteous to display a progress bar and/or show some sign of activity (such as the current application being checked in this case).
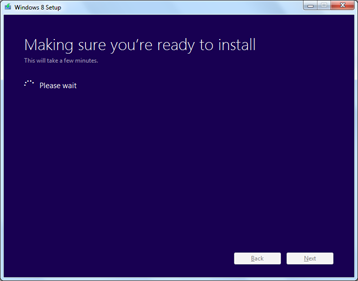
enter image description here

1 hour later...

Finally, I got a report on the applications which would need to be uninstalled. Since they didn't seem important, I quickly uninstalled these, and restarted my computer.
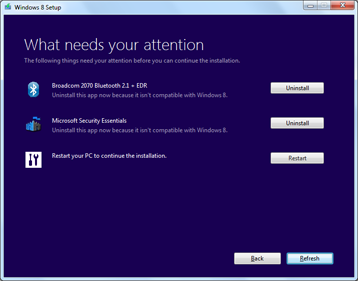
enter image description here

After restarting, you need to log in again before it prompts you to continue with the upgrade.
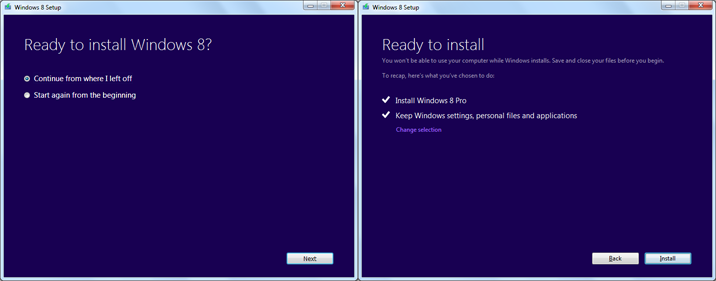
enter image description here

After continuing, you get hours of waiting, which sometimes displayed the progress for part of the upgrade, but other times, only provided a spinning animation, which in my opinion, is insufficient feedback.

enter image description here

3 hours later...

Eventually, you can personalize and setup your Microsoft account, after which it installs some apps.
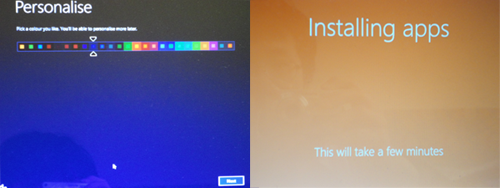
enter image description here

It doesn't take too long, before lo and behold, it's done, and displays the start screen.
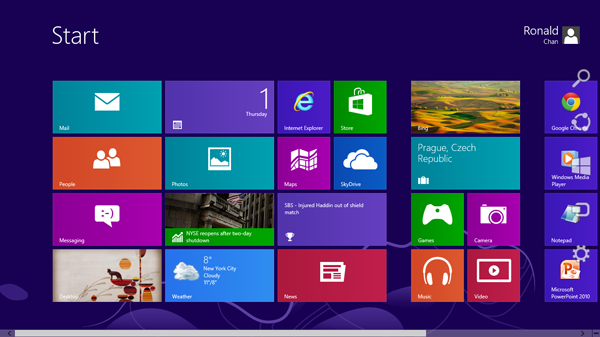
enter image description here


Picking up the pieces

I immediately wanted to know which applications still work, and which do not. I got messages for which applications no longer work:

  • ATI Catalyst Install Manager
  • MagicISO
  • Bullzip PDF printer
  • EAGLE CAD

Removing MagicISO, I also had to change the filetype association before mounting works in Windows 8. Further checks show that most programs were unaffected. Oracle VM VirtualBox, Cygwin, AVR Studio 5 continue to work.

Without the graphics card update (Catalyst), I found it using the integrated Intel graphics card instead of the Radeon M5650 on my laptop. There is an error message when checking the Device Manager. So I try getting the graphics card drivers to update (Device Manager > Display Adapters > AMD Radeon HD > Update Driver Software), but the driver installed doesn't work with the graphics card.

enter image description here

After going through a forum thread, it appears that HP has not sorted out new device drivers for Windows 8 yet! The lack of support is shocking, and attracts numerous disgruntled remarks, including vows not to buy HP in the future, but it appears that it is possible to install the current reference driver provided by AMD, download and install it on top of the HP release. This is done so that the switchable graphics feature can continue to operate properly. Thus, since I already had the HP release (for Windows 7) installed, I downloaded and installed the appropriate Catalyst 12.10 reference release. After installation, the graphics card starts working. However, I notice that this causes the computer to think that there are two monitors, and therefore two desktops (one of which I cannot see). Re-installation of the drivers does not appear to fix this. Instead, in display settings, I selected Multiple Displays: Show desktop only on 1. This worked for a day or two, but it was unstable, and the display did not turn on after turning off (from inactivity), unless the computer was put to sleep and re-woken. Then, the discrete graphics card generated an error, and was automatically disabled. Given the problems, I decided to wait a few weeks and re-evaluate (if no official driver is released), whether I should install an unofficial driver (eg. Leshcat, though I have not confirmed if it supports switchable graphics with a Generation 1 Intel graphics card), or if I should use an official driver for the discrete graphics card in fixed mode.

Then, just when I thought I had sorted everything out, I was hit with another problem. At university, I was unable to connect to wi-fi. Confused, I checked my phone (because service is sometimes intermittent), which had no problems. IT support told me that it was not working on Windows 8 - and with a little research, I found that Cisco has a bug in their drivers triggered by a new feature in the Windows 8 drivers. Because the fix is still beta, and it could take a while before the updated drivers are installed. One possible solution is to downgrade to a pre-Windows 8 driver, but it seemed difficult to manage. I decided to try tethering and connect to wi-fi through my LG P500 Android. My experience here was frustrating - almost as much as with the graphics card. Numerous ways to tether failed:

  • built-in tethering - only works with mobile data (does not work with wi-fi)
  • PdaNet USB tethering - No internet detected by computer, using mass storage mode (only one available) instead of charge only mode
  • FoxFi over bluetooth - phone does not support PC connection, only sending and receiving files
  • FoxFi over wi-fi - phone cannot act as both access point and client at the same time

I found EasyTether worked over USB, on my home wi-fi, but it did not work at university. Perhaps the university network prevents sharing of the wi-fi signal due to some other reason. Eventually, I just used my university's unsecured guest wi-fi, and logged in through the web browser to access the internet.


Evaluation of upgrade experience

Overall, upgrading takes a while, the in-place upgrade to Windows 8 makes it very convenient, because I don't have to re-install all my applications - possibly the largest barrier to upgrading, and most applications are unaffected. Therefore, I would highly recommend that users consider using this convenient upgrade path.

The most frustrating part - the lack of official HP graphics card support for Windows 8, but this problem is specific to laptops with OEM graphics card drivers (if you do, check if your manufacturer has released drivers for Windows 8).

I have not yet tried to update the other non-working applications to see if they work on Windows 8, mainly because I don't need them - at least not soon, and there are substitutes if they don't work.

Before upgrading, users should consider whether their wi-fi access point supports Windows 8, especially if they have no control over their access point (even Cisco routers can fall back to TKIP), or wait until there is support for Windows 8.

3
  • This is extremely specific. Might be useful for some people out there though.
    – nhinkle
    Commented Nov 2, 2012 at 7:26
  • Even if other people do not have the kind of system with these problems, they can still see what parts of the upgrade is simple, and where problems have the potential of cropping up. Also, some problems have wide applicability, eg. if desktop = probably only minor application incompatibilities, if laptop with graphics card = should check if suitable driver released, if using wi-fi at an institution or company location = check if they are using Cisco routers
    – ronalchn
    Commented Nov 2, 2012 at 7:39
  • You spend over 12 ours upgrading windows and writting it down. deservers a +1 :)
    – Piotr Kula
    Commented Nov 6, 2012 at 23:48
0

Thoughts on Windows 8

It's received heavy criticism from quite a few places, but I am rather fond of Windows 8.

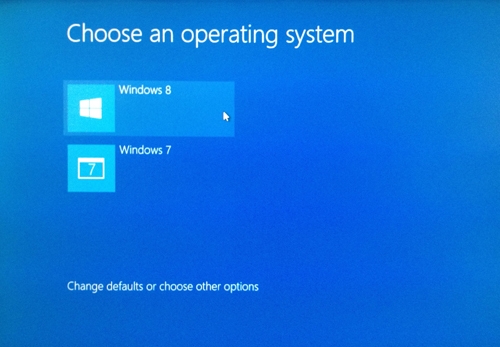
The day after it was released I upgraded, and put Windows 8 on a new partition so I could dual-boot. Dual booting is neat. You get a metro style page to choose which operating system to run, and overall it's a very smooth process. One massive drawback though. I installed Win8 on D: (7 being on C:), and much to my annoyance, a lot of the registry for Win8 pointed to the incorrect C: drive. This gave problems such as my start menu folder being located on C:, and the libraries pointing to my old Win7 libraries on C:. This inconvenience has led to me reinstalling Win8 on C:, and ditching 7. Overall though, switching from Win7 to 8 was pretty smooth

dual boot ui

The neat dual-boot UI.


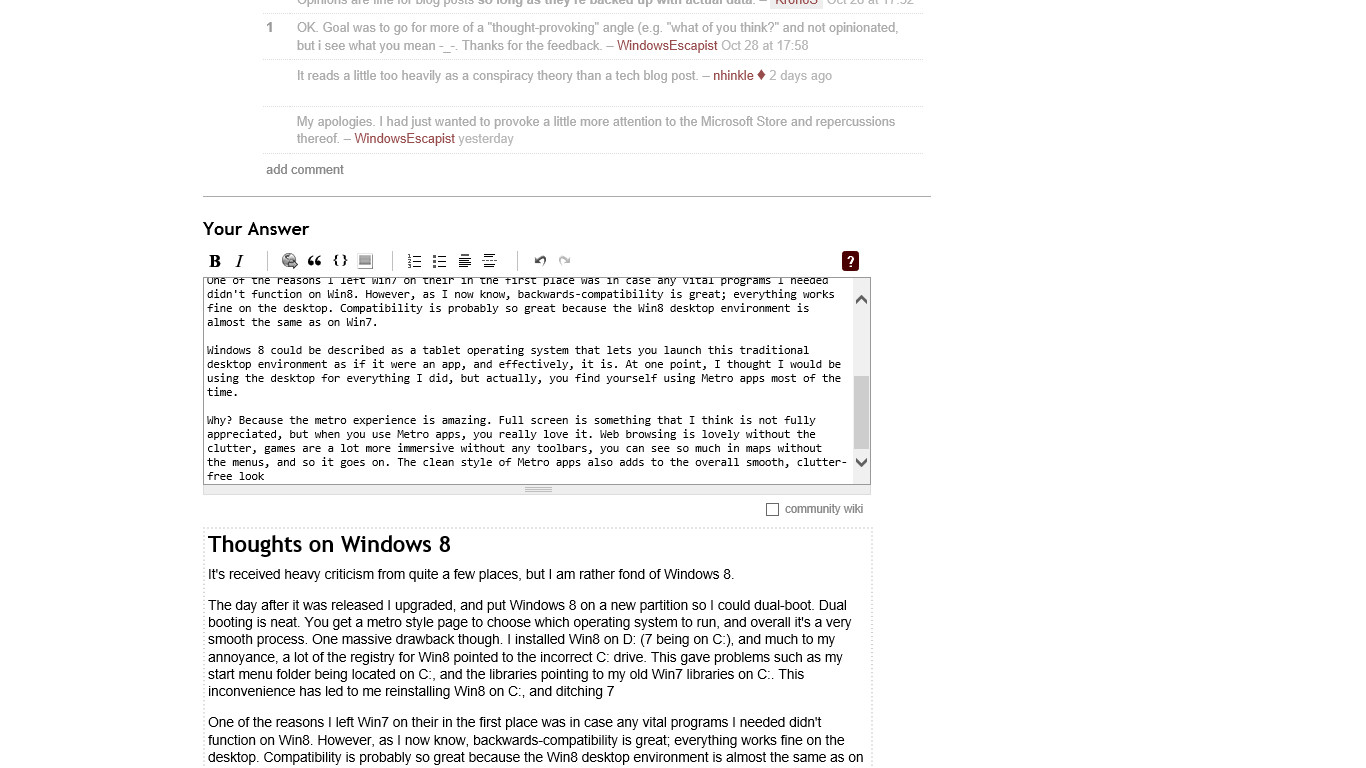
One of the reasons I left Win7 on their in the first place was in case any vital programs I needed didn't function on Win8. However, as I now know, backwards-compatibility is great; everything works fine on the desktop. (Compatibility is probably only so great because the Win8 desktop environment is almost the same as on Win7.)


Windows 8 could be described as a tablet operating system that lets you launch this traditional desktop environment as if it were an app, and effectively, it is. At one point, I thought I would be using the desktop for everything I did, but actually, you find yourself using Metro apps most of the time. There is a nice multitasker built in for metro apps, but it does have restrictions that become frustrating when using a large monitor: you can only use two apps simultaneously, and they must occupy 1/3 and 2/3 of the space respectively. (You can, of course, do whatever multitasking you like inside the desktop)

multitasking on a tablet

The multitasking is nice for a tablet, but becomes restricting on a larger screen


Why? Because the metro experience is amazing. Full screen is something that I think is not fully appreciated, but when you use Metro apps, you really love it. Web browsing is lovely without the clutter, games are a lot more immersive without any toolbars, you can see so much in maps without the menus, and so it goes on. The clean style of Metro apps also adds to the overall smooth, clutter-free look.

writing a post of meta in metro

Even writing a post here is so immersive on metro!


Startup and shutdown are also brilliantly quick on Windows 8.
startup times

A visual look at startup times.


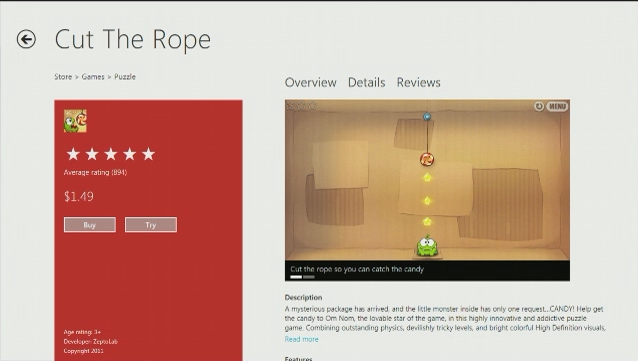
I've heard criticism of the new Windows Store (paying for entry to a store targeted mainly at PCs...), but the store has brought a way for applications that we are used to running natively on tablets and smartphones to run natively on PC. You would not be able to play something like 'Cut the Rope' natively on any other desktop platform.

cut the rope in the windows store

Applications we are used to on mobile OSs running natively on Windows 8.

Whilst it is not fully optimised for desktop computers (I think the tablet like start screen means it would work best on touchscreen laptops), Windows 8 is a great new operating system. It's easy to switch, runs everything that runs on 7, and gives you a great new experience in Metro apps such as web browsing and email.

-1

Toolkits for Windows 8 Development

With Windows 8 now formally launched, it's time to get your hands dirty working on it.

A number of extensions and toolkits have been built and released on various sites to enable developers achieve better productivity and faster development. Here are some of them:

Callisto: A toolkit for XAML Windows 8 Store apps

Built by Tim Heuer, it is a toolkit of sorts for XAML-based Windows 8 Store apps. He started it during the Consumer Preview and has put it up on github.

https://github.com/timheuer/callisto

As of today, Callisto includes a Flyout, a Menu, MenuItem, an in-app tile experience with LiveTile, an effect called Tilt to provide tilting experience when clicked on edges/corners, converters such as BooleanToVisibilityConverter, RelativeTimeConverter, and LengthToBooleanConverter. Callisto can be downloaded from github or can be used through Visual Studio 2012 as an extension or through NuGet. A few people who have actually used this tool have it given it great feedback and reviews.

WinRT XAML Toolkit

The Windows Runtime (WinRT) XAML Toolkit can be found at Codeplex and contains a number of controls and helpers that help you build Windows 8 Store applications.

This toolkit includes integrated extensions from the AsyncUI library that add support for async/await tasks, controls such as CameraCaptureControl, CascadingTextBlock, Chart, ImageButton, InputDialog and more. It also includes Control extensions, debugging helpers, IO helpers and so forth. It can be downloaded via NuGet or the codeplex page.

http://winrtxamltoolkit.codeplex.com/

Windows Azure Toolkit for Windows 8

This toolkit makes it easy to build a cloud service to support rich Windows Store apps. It has all the tools to enable easier development of a Windows Azure service and deploy it to users. The toolkit includes Visual Studio project templates for a sample Windows Store app and a Windows Azure cloud project.

http://watwindows8.codeplex.com/

Windows 8 apps: Multilingual App Toolkit

This toolkit is an extension for Visual Studio 2012 helps you localize your Windows app with translation support, translation file management, and editor tools.

http://msdn.microsoft.com/en-us/windows/apps/hh848309.aspx

Simple Mvvm Toolkit for Visual Studio 2012

This Toolkit provides an easy approach to create Silverlight and WPF apps using MVVM. It comprises helper classes, templates, code snippets, and so forth. It is available as a Visual Studio 2012 extension.

3
  • 1
    Hi Marnta! Thanks for your submission, but your article is a little short. Maybe you could give some concrete examples of what you can do with these toolkits, etc.? Also, having a title would be nice!
    – slhck
    Commented Nov 4, 2012 at 18:45
  • Concrete examples for all of the above at this stage is expecting too much! I m afraid that much of detail won't be possible right now. I can however elaborate generally on each of these without giving any examples. Is that ok?
    – Mamta D
    Commented Nov 5, 2012 at 4:17
  • I guess that would be fine :)
    – slhck
    Commented Nov 5, 2012 at 6:56
-4

One Simple Thing You can Start Doing Now with Windows 7 to make the transition to Windows 8 Easier

The Start Menu has a been a fixture of Windows computers since way back in 1995. Windows 8 changes that in a big way. The Start Menu is gone, and there is no way to bring it back without the use of third-party software that is often quirky and not as well thought through as it could be. The transition to the new operating system can be confusing, but there is one thing you can start doing right now in Windows Vista and Windows 7 to prepare yourself for the changes and help ensure they don't slow you down.

Windows Vista introduced a new search feature to the Start Menu. Open the Start Menu, start typing the name of the program you want to run in the search box at the bottom of the menu, and that item will appear after typically no more than the first 3 or 4 keystrokes. Bonus points if you can learn to do this without ever touching mouse; just hit the Windows Key on your keyboard and start typing, then hit enter when the item you want is at the top of the list. Don't even wait for the menu to show; just treat the Windows Key as another keystroke. In no time, you'll find this workflow is faster and easier than the old browse-the-menu-with-the-mouse scheme you had been using. This feature was carried into Windows 7 as well.

Here's the trick: all of that still works in Windows 8. In fact, it works even better because of the way Microsoft handles the new menu: it's faster, and your search will usually have better results. If you don't have a touch screen, this is now, by far, the easiest way to find what you're looking for on the start menu. Unfortunately, most people never learned how to fully use this feature on the older operating systems, and the visual cues that help you discover it are gone on the new Windows 8 operating system. However, if you start practicing this new workflow in Windows 7 or Windows Vista today, you'll find it comes naturally for Windows 8... and I think you'll find the transition to Windows 8 much easier.
3
  • Note that I intend to publish this on my own blog as well, but for contest purposes I can wait for a few weeks. Commented Nov 5, 2012 at 15:22
  • Curious what it is people don't like about this post. Commented Nov 8, 2012 at 15:11
  • Perhaps "One Simple Thing" and other Buzzfeed-style clickbait elements. The title should be descriptive, not "click to actually know what I'm talking about".
    – wizzwizz4
    Commented Apr 18, 2018 at 16:39

You must log in to answer this question.

Not the answer you're looking for? Browse other questions tagged .